Wednesday, March 27, 2013

Surprise Party

Last week was my mother's 70th Birthday. She is a humble, sweet, endearingly good and righteous elect lady in all ways imaginable. She would blush at that compliment and protest that she has many faults, but as her children, we don't see any. We all feel greatly blessed to have had her as our mother!

My sisters decided that she needed a party...and it needed to be a surprise. And boy, was it ever! Dad played his part perfectly and convinced her they were going to a 50th Wedding Anniversary celebration for some friends. She felt a little mortified that there weren't any other people in the hallway coming to wish the happy couple best wishes and was very afraid that when they opened the door, there would just be a handful of people sitting around a table:
We knew she wouldn't want a big group, so it was just our family there to give her all the love she so deserves. My sisters really went over the top with tons of pictures of mom blown up all over the walls ("It's perfect: She'll hate it!" Megan gleefully proclaimed) and my contribution (since I'm 3 hours away and my family made it just in time for the party) was a Happy Birthday Banner.

While you can see it in the picture with my silly sisters, here's the banner I made up close: 
 
I was so tickled to have this picture with all my siblings and parents: I love my family!!

And the whole family (minus 4)):

Funny story: Megan baked Grandma's delectable German Chocolate birthday cake and the DIVINE Almond Joy cupcakes. My son Braden is a pretty picky eater, but one bite of that cupcake and he ran to his dad and said, "DAD! YOU HAVE GOT TO TRY THIS!!! This cupcake was made by JESUS!" Certainly Jesus would have appreciated Megan's baking skills and agreed that she is a heavenly baker :) I'm not sure we lighted ALL 70 candles on the birthday cake, since they started lighting them from the outside circle. But it tasted delicious even with a layer of wax!

We played LANA JEOPARDY, broke open a pinata and a great time was had by all. Love you Mom!!

Credits:
World's Best Mother: Lana Larkin
Oustanding Actor: Derrill Larkin
Party Planner Extraordinaire: Mindi Clove
Baker from Heaven: Megan Marchant
Pinata Provider: Ryan Larkin
Graced by His Presence: Mike Larkin
Man of the Hour: Russ Clove
Greatest Husbands in a Supporting Role: Neal Marchant, Cody Spendlove
Grandest Kids: Braden,  Kamryn, Kaitlyn, Chandler, Abbey, Mia, Gregory, Emery, Nathan, Madeleine, Cole, Libby
Missing-in-Action: Alison, Kiersta, Kayson, Whitney


post signature

Monday, March 25, 2013

Friday, March 22, 2013

Last Day to Sale-A-Brate in 2013

Today is the final day of Sale-a-Bration and your last chance to choose a FREE product with each $50 purchase! Order from my online store before 10 p.m. tonight AND enter Hostess Code 6RHRVE93 and you will also be entered for a chance to win another Sale-a-Bration product OR a $20 gift certificate!

Don't miss the chance to get one of these stamp sets free because after today, they are gone!
 
 Vintage Verses

Feeling Sentimental 

 Bloomin' Marvelous

 Patterned Occasions

 Pretty Petites

Madison Avenue

UPDATE 3/25/13: Congrats to Laurie Z and Samantha K who won a Madison Avenue Stamp Set and $20 Gift Certificate, respectively!

post signature

Thursday, March 21, 2013

Consider Yourself Part of the Family!

There are a million reasons to become a Stampin' Up! demonstrator, but let me share just three today:


1. INSTANT FRIENDS! You'll find yourself embraced by incredibly talented people who immediately love you and want to help you discover your inner creativity! My Stitched Stamper family is a group of optimistic, fun-loving, artistic, friendly people who love sharing with each other and I'm proud to be their "mom". There is always room in our family for more!
 

2. A company you will be PROUD of! On the leading edge of creativity and crafts, Stampin' Up! continues to lead the way into the CRAFTING ERA. The products are the BEST in the industry and SU! values it's demonstrators above all. A financially stable, service-oriented, open-hearted, international organization you'll be grateful for, as I am!


3. 25% MORE FREE...but only through tomorrow!! You can get the starter kit for just $99 and choose $150 in product when you join my Stampin' Up! family before 11 p.m. on FRIDAY March 22nd. What a great way to get your fingers inky and see the value of our products!

Why not try Stampin' Up! for a few months and see if you like it? I'm here to help you achieve the success YOU want to achieve, whether it's to become more artistic or earn an extra income. Click the link below to get started or email loni@sfcn.org to ask questions.

post signature

Wednesday, March 20, 2013

All Ears


This trio of bunnies are too adorable for words and I've been looking for an excuse to use them, so I combined sketch #78 from the Freshly Made Sketches blog and the color inspiration on my Creative Juice by Loni Facebook page...and it turned out so sweet! Of course, I had to add the bunny tails, so it's really NOT JUST all ears...

Card Recipe: **All supplies from Stampin' Up! of course!**
  • Stamps: Ears to You single stamp (Item 132659...only available through March 31, 2013!)
  • Ink: Bashful Blue, So Saffron, Lucky Limeade & Crumb Cake Stampin' Write Markers
  • Paper: Crumb Cake, Very Vanilla, Whisper White & Bashful Blue card stock. Tea for Two Designer Series Paper (129311)
  • Accessories: Lucky Limeade Ruffled Ribbon (122977), Labels Collection Framelits (125598), Big Shot (113439), Honeycomb embossing folder (119378), Scallop Edge Border punch (119882), Itty Bitty Shapes punch pack (118309), Pearls Basic Jewels (119247), sanding block, Stampin' Dimensionals
post signature

Monday, March 18, 2013

A Happy Hello/Goodbye Sale-a-Bration

5 days left of Sale-a-Bration and I've had fun demonstrating these boxes at my March parties from the Happy Hello Card Kit:
The instructions for the boxes are on Barb's website HERE...and my only change/suggestion to make it easier is to put your card on the Simply Scored with the flat side flush against the left side and score at 1", then flip the card over so the other flat edge is flush against the left side and score again at 1". Turn the card so the blue chevrons are on the left edge and score down the edge of the pattern at 3".

I used a clear envelope with the sticky flap cut off for the "bag" inside the box and filled it with chocolate, my favorite treat.

They are really fun to make, but since the kit comes with 8 cards and envelopes (and everything else to make these cards)...
...I had a lot of these cute envelopes left over! What to do with them?? So I came up with this:
It's a gift card holder!
Here are the simple steps to make your own:

1. Cut white card stock 2-3/4" x 9-3/4". Score at 1-7/8" and 5-7/8" on the Simply Scored Tool (122334).  Punch a half circle (I used the 1-3/8" punch) on the smaller flap edge and the Scallop Trim Border punch (118402) on the larger side edge. Adhere sticky strip to the very edge of the smaller flap sides.
2. On the opposite side of the card stock, stamp your image. NOTE: This image is from the Carry On set which is only available when you host a party and will be retired at the end of May...call me today to schedule a private class :)
3. Remove red from sticky strip and fold in to create pocket. Add a small strip of colored card stock under the decorative edge and mount the pocket to a 4-1/4" x 3" piece of card stock.
4. Take the envelope from the Happy Hello Sale-a-Bration card kit and score at 1-3/8" and 4-1/2" using the Simply Scored.
5. Insert a 3-3/4" x 3" piece of Designer Series Paper into the scored envelope and mark with pen so you know where to trim:
6. Remove the DSP, trim and adhere to center front section of envelope. Trim into the envelope flap along score lines, fold and adhere to sides (or remove). Insert card into envelope.
7. Punch 8 layers of Creped Filter Paper (129393) using 1-1/4" scallop circle punch (127811) and push brad through the center of all circles. Scrunch each layer up to form flower. Spray flower with Stampin' Spritzer (126185) filled with rubbing alcohol and 4 drops of re-inker (I used Melon Mambo). Create a belly band with the Dotted Scallop Ribbon Border punch (119275) and insert flower brad to secure in the front.
Voila! A beautiful way to present a gift card AND use up those gorgeous envelopes from the Happy Hello Card Kit from Sale-a-Bration!
to purchase the items used in this tutorial and get the Happy Hello Card Kit FREE when you spend $50...but hurry! It's only available through Friday, March 22nd when we must say GOOD-BYE to Sale-a-Bration 2013 :(
post signature

Thursday, March 14, 2013

Framelits: A Gate-Fold Card Tutorial VIDEO

HOLY COW! I *seriously* underestimated the time it would take to make (and edit!) a video tutorial!I have been reluctant about starting videos because I knew they would take time...I just had no idea HOW MUCH time they would take :p

Now my complaining is out of the way, I am pretty pleased with it. Like having a baby: Perhaps the amount you love them is commensurate in some way to the amount of pain you go through to bring them into (and keep them in) the world!!

Before the tutorial, let me show you the superbly adorable and infinitely superior cards I created...no need to organize a parade...a simple kind comment will suffice :)
Without further ado, I present unto you my first-born video tutorial!


Whew! I feel like I may need nine months of recovery before I try another one...or maybe I just need to hire someone who can edit video and do graphic design for me...

In other news, I had a total mother PAYBACK yesterday with my eldest son! It was such a beautiful day to hear him say, "My mom is always right" and tell me how blessed he feels. Those moments are worth everything we went through to hear it! Life is good :)
post signature

Tuesday, March 12, 2013

Oh Hello

When was the last time you sent a card to a friend "Just Because"? Getting a hand-stamped card in your mailbox makes you feel so loved! Who do you know that needs one of these cards to brighten their day?
I am really having fun with the Label Collection Framelits (see how to cut the edge of your card in this tutorial) and this time I paired it with the new Borders plate for the Simply Scored to create the raised edge! And can you see the paper-pierced scallop border peeking out from the inside panel? Yep, I pretty much love everything about this card and hope that the friend that gets it loves it too.

Actually, I can think of a few people who need one, so I'll have to make a few more to spread the joy!

Card Recipe (all Stampin' Up supplies):
  • Stamps: Oh, Hello (pg 4 of Spring Catalog)
  • Ink: Lucky Limeade and Primrose Petals Stampin' Write Markers, Crumb Cake ink pad
  • Paper: Card stock~ Primrose Petals, Very Vanilla. Tea for Two Designer Series Paper (129311)
  • Accessories: Label Collection Framelits (125598), Big Shot (113439), Simply Scored (122334), Borders Scoring Plate (126192), Essentials Paper Piercing Pack (126197), Paper Piercing Tool (126189), Stampin' Pierce Mat (126199), Decorative Label punch (120907), Stampin' Sponge (101610), Very Vanilla Seam Binding Ribbon (120999), 5/8" Flower Trim (126869)
Visit SYCJ again tomorrow afternoon for another fun card 
using the framelits!!!!
post signature

Thursday, March 7, 2013

Sisters & Sunshine Jars

These are my sweet sisters, Megan and Mindi:
Hard to believe, huh? Yes, we all have the same parents: But while they got the talents and looks (that beautiful dark skin!), I got the...well, I got the...

...okay, I got the great sisters!

They have been life-savers for me throughout my life (my interior designers, fashion consultants, reality-check, manicurists and wedding planners) and while we love each other more than life itself, sometimes we don't always see eye to eye, which makes me love this quote:

"If you don't understand how a woman could both love her sister dearly 
and want to wring her neck at the same time, 
then you were probably an only child."  ~Linda Sunshine

Remind me to tell you about the "Die a Virgin" incident....but I digress.

Last month was Mindi's birthday and after all her hard work on the wedding, I wanted to do something really special for her. At a scrapbook retreat, my friend Jennifer F. shared an idea for a "Joy Jar" she made for one of her sisters and I ran with it:
That is the jar. Doesn't it just bring a smile to your face? I like to think of it as a "Jar of Sunshine" Here's the top:
Mindi doesn't fully realize the amount of joy she brings into the lives of others, and I wanted her to get a little taste of what a blessing she has been in my life. And occasionally, the world seems a little dark to her and when she struggles against depression, this jar holds a few ideas of ways to let in the light :)

Inside the Sunshine Jar are envelopes with an opportunity to discover JOY:
Sometimes they are opportunities to serve, sometimes they are opportunities to play, occasioanally they are chances to grow and sometimes they are just FOR FUN! Once in a while there is a number on the card and it corresponds to a gift wrapped individually in a bag. 

Because Mindi's husband is the manager of a hotel and they travel ALOT, and never do they stay at less than a 4 star hotel...this luggage tag was one of my favorite coordinating gifts
 
(in case you can't read it, it says "I'll follow you to the ends of the earth...but not to Motel 6")


Joy Jar Recipe:
All from Stampin' Up! unless indicated by *asterisk. To order supplies to make your own, click HERE.
  • Stamps: Feel Goods (Spring Catalog pg 21) and Blue Ribbon (Catalog pg 33)
  • Ink: Tangerine Tango
  • Paper: Try Summer Smooches Designer Series Paper (item 125409) Card stock: Whisper White, Daffodil Delight
  • Etc: Paper Doilies (129399), Calypso Coral Baker's Twine (122976), Punches: 1-3/8" Circle (119860) and 1-3/4" Scallop Circle (119854). Simply Scored Tool (122334) to make the rosette on front. Big Shot (113439) and Scallop Envelope Bigz Die (113462). Wide mouth jar and lid. Ribbon.
  • Optional: Iridescent Ice embossing powder (101930) and heat tool (129053) 
 
Here are some ideas if you'd like to create your own Joy Jar/Jar of Sunshine, here are a few ideas of opportunities to include inside and as coordinating gifts (and BTW, Mindi, these aren't necessarily in your jar):

  • Pay for someone's order behind you at the drive-through restaurant (include $)
  • Blow Bubbles (wrap a jar of bubbles)
  • Read a book to a child
  • Try a new exercise (dvd, gym trial membership or workout clothing)
  • Take a flower to a friend just because
  • Crank up the music and DANCE!
  • Write 20 things to be happy for in a journal (wrap a new journal)
  • Listen to classical music for half an hour
  • Make a fruit smoothie in your blender
  • Take a drive alone. Park somewhere with a view and thank God for your eyes.
  • Bake cupcakes (wrap a cake mix, cute cupcake wrappers, frosting & sprinkles) and share some with a friend
  • Go on a picnic
  • Share your favorite scripture of JOY
  • Send a card to a friend
  • Take out the trash for your neighbor
  • Give them a reason to practice a talent: Do they paint? Wrap a paintbrush. Play an instrument? Give some music! Craft? Give them a Paper Pumpkin* subscription :)  *choose me as your demonstrator!
  • Plan a party for friends (Murder Mystery Dinner? Minute to Win It?)
  • Pop Pocorn and watch a movie (wrap popcorn)
  • Build a fort
  • Forgive someone
  • Clean out your purse
  • Get a pedicure (gift certificate or nail polish)
Help me build this list! I know there are other great ideas out there, so share them in the comments, please!

post signature

Tuesday, March 5, 2013

Shoebox Swap: Fun for All

All for Fun and Fun for All!
That's what happens when stampers get together: We enjoy the company and the creativity! Last week a few of the Stitched Stampers (my SU! family of demonstrators) met in St. George, Utah for a few days of FUN. Friday evening we held a shoebox swap and here is the result:
What is a shoebox swap? Each person brings one finished sample and all the supplies cut and prepared to allow everyone else to make the same project!

Anne is our resident dressmaker/seamstress, so this is her fitting card:
 

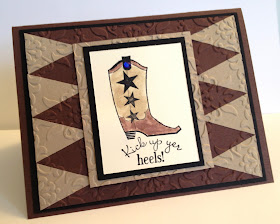
 Pam lives on land with animals, and we loved her masculine card using the pennant punch and boot:

Sue is clean and simple...with a little bling:

Angie is lighthearted and whimsical, matching the card she made:

You should see some of the beautiful cards Sally has created with the Secret Garden set...this is a cheerful one (and I smeared my ink, darn it!):

Then we put our cards into this card keeper I brought for the swap...and you can make it at the Spring Card Buffet on April 25th :)
We love expanding our circle of friends and if you want to join us for more fun as a demonstrator, NOW is the perfect time to be part of the family! During Sale-a-Bration, you get 25% MORE free product in your starter kit (that's over $150 for just $99...includes shipping!!). Why not try it?

Join my Stampin' family HERE.

There is no obligation, but I suspect that if you try it, you'll discover that sharing your passion for paper, stamps and ink is addicting and you'll LOVE IT!

After all, Stampin' Up! is All for Fun, and Fun for ALL!

post signature