Showing posts with label Handstamped. Show all posts

Thursday, June 26, 2014

Super Birthday

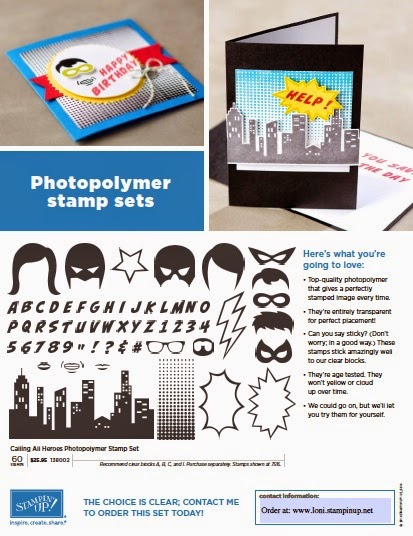
I really do have a great excuse for being absent for 6 weeks (yikes! has it really been that long?!) and you can come back tomorrow so I can catch you up on what that was, but for today let me share my favorite new Photopolymer stamp set: Calling All Heroes!

Living in a household of comic book nerds (they correct me when I mix up Marvel and D.C. characters...apparently Avengers don't mix well with Xmen or Justic League) this stamp set was a no brainer! I've discovered I also love the alphabet that comes with it for little letters:
http://bit.ly/1d6IxdM
 
I am *REALLY* close to earning my first ever trip with Stampin' Up!...I only need about $500 in sales by Monday, June 30...so if you have been needing supplies (card stock, adhesive, new stamps, punches, glitter, etc) would you please order it on my website  or give me a call (801-376-8685) ASAP? And if you use Hostess Code KEYE2EX9 with that order before the end of June, I'll send you a THANK YOU gift for helping me reach my goal...using the Calling All Heroes set ;)

Have a SUPER day!
post signature

Friday, May 9, 2014

Bee Inspired...By a Challenge

I've been itching to update the blog and this card gave me a reason to do it! It was a wonderful opportunity to combine the Splitcoast Stampers Embossing Folder Stamping technique , the color challenge over at Create with Connie & Mary and the SUonly Birds, Bees & Butterflies challenge :


Card Recipe (All supplies can be ordered from my Stampin' Up! Store):

Stamp Sets: Flower Shop, Petite Petals, Feel Goods
Ink: Calypso Coral, Daffodil Delight, Bermuda Bay, Basic Black
Paper: Watercolor paper, Daffodil Delight, Calypso Coral and Very Vanilla card stock
Accessories: Petite Petals and Pansy punches, Oval Framelits and Big Shot, Honeycomb embossing folder, Gingham Garden washi tape, large Rhinestone Basic Jewels, Crisp Canteloupe thick baker's twine, colored Sharpie Markers, Stampin' Dimensionals.

post signature

Thursday, January 16, 2014

Celebrate the Everyday Card Class

Relax and enjoy crafting at my next card class where you will create 8 cards to help you celebrate the everyday occasions of your life! Bring your scissors and adhesive and I'll provide everything else.

Celebrate the Everyday Card Class
Saturday, January 25 at 1 p.m.
Loni's house in Spanish Fork, UT
$15 per person
Cost is just $15 and please register (below) by January 21st. Come stamp with me!


post signature

Friday, November 22, 2013

Endless Wishes: 5 Ways on Fridays!

Well, I had this ready for last Friday when my computer was out of commission...and wouldn't you know it: Stampin' Up! sold out of this awesome Photopolymer stamp set on Tuesday!!! GRRRR...

But I'm sharing it anyway because of all the time and effort I put into it, and those of you who were lucky enough to snag one before they sold out~ You're Welcome! Of course,  many of the designs & techniques could be re-created with another snowflake stamp set, such as Festive Flurry :)

P.S. Endless Wishes *is* available as a digital brush set (item #136559) for all you digi-crafters and if SU! changes their minds and produces more, I'll make sure to update this post (we can hope, right?)

1. Faux Diamonds. This is always a big hit and so very easy! I gave step-by-step instructions on the Faux Diamond technique in this post. The Designer Series Paper is from the Winter Frost Specialty DSP (132341)

2. Random Stamping. Just go crazy with it. Let them overlap, go off the edge of the paper and layer them on top of one another. I really loved the look of White/Baked Brown Sugar/Cherry Cobbler on Crumb Cake card stock and even stamped a piece to go on top of my jar of apple pie filling.

3. Make a Window. The Squares Collection Framelits (130921) and the Big Shot (113439) create perfect windows. I used a piece of a window sheet and stamped the snowflakes using the White Stazon ink pad (106960), then placed it between the Navy and (polka dot embossed) Blushing Bride layers to appear that you were gazing outside to a frost covered world.

4. Use the Words. While the snowflakes are delicate and delightful, the words are what sold me on this set. It's awesome to be able to mix up the script with the print and come up with dozens of greetings. So cute! I paired the greetings with some of the Season of Style Designer Series Paper (132340), the 1" Cherry Cobbler Grosgrain ribbon (132135) and Cherry Cobbler Baker's Twine (123125) and a Vintage Faceted Designer Button (127555).

5. Monochrome Embossing. The words & snowflakes on the white were simply stamped using the Silver Encore pad (132141) and I embossed in silver on the Silver Foil Sheet (132178). This card is stunning in person, though the photo doesn't do it justice (sorry...I tried). Just because it needed MORE bling, I added the Silver Glimmer paper (124005) as a layer, too!

Stamped snowflakes are much warmer than the real thing, eh?
post signature

Thursday, November 21, 2013

Stretching My Muscles with Mosaic Madness

It was a challenge in the truest sense of the word: This color combination from Create with Connie and Mary made me stretch my creativity!
Since it was a challenging color scheme, I chose to use a stamp set I haven't had any inspiration with either (a double whammy, I guess you could say). Here's my creation:
It turned out better than expected, and I feel more confident in using the Mosaic Madness stamp set, too.

Card Recipe
Stamps: Mosaic Madness, Yippee Skippee
Ink: Always Artichoke, Sahara Sand, Tangerine Tango ink pads and markers
Paper: Naturals White, Always Artichoke and Sahara Sand card stock
Accessories: Mosaic Punch (131267), Big Shot (113439) and Modern Mosaic Embossing Folder (129984), 1/8" Mini Brads (122941), Stampin' Dimensionals
post signature