Thursday, February 28, 2013

Your Creative Carriage Awaits

Cinderella was tired of washing dishes, scrubbing floors, folding laundry and waiting on her cruel step-sisters hand and foot: She dreamed of escaping her every day drudgery! When the pumpkin i her garden was magically transformed into a carriage (designed to whisk her away to a fairytale castle) she happily hopped aboard.

Don't let your "Paper Pumpkin" drive past 
without jumping in!

Q: What is My Paper Pumpkin

A: Each month, a unique kit arrives at your door in a beautiful red box and contains stamps, ink, paper and accessories (everything except adhesive)...everything you need for a 30-minute creative escape! What could the project be? Cards, Journals, Decor, and more! And everything is color-coordinated, measured and cut for you.

Q: How much does My Paper Pumpkin cost? 

A: Membership is $19.95 per month (including shipping!) and you can continue as long as you'd like, or cancel at any time. You can also skip a month, too! You must sign up for a kit by the 10th so it can ship around the 15th. There is also a Trial Kit for just $16.95:

Q: Who should try My Paper Pumpkin

A: Anyone who desires a creative escape! It makes a GREAT GIFT, too.

Q: How do I sign up for My Paper Pumpkin

A: Click on the link above (or the Paper Pumpkin Logo) and select Loni Spendlove as your demonstrator after you enter your payment information. SIGN UP TODAY as the first kit will ship in March 2013!

Here's a peek into the Welcome Kit from My Paper Pumpkin: You can see it includes stamps, ink, paper, embellishments and even a clear block, as all stamps in MPP kits will be clear mount!

Go ahead, you have my permission to break away from the mundane and bring some Pumpkin magic into your life!

post signature

Wednesday, February 27, 2013

Going Green

I was thinking about March (wishing it was here already) and St. Patty's day when I saw that the challenge at SUOnly was GOING GREEN! 

Card Recipe
  • Stamps: Got Treats (catalog page 51)
  • Ink: Certainly Celery, Wild Wasabi, Garden Green
  • Paper: Certainly Celery, Wild Wasabi, Garden Green card stock, Subtles Designer Series Paper Pack, Whisper White
  • Etc: Punches: Postage Stamp (122344), Scallop Square (119884), Scallop Border (119882), Word Window (119857) and Modern Label (119849). Big Shot (113439) and Perfect Polka Dot embossing folder (117335). Gumball Green Stitched Satin Ribbon (126848)

post signature

Friday, February 22, 2013

Easter Comes Early

As Easter is on March 31st this year (and it's just around the corner), I thought it would be fun to teach a Craft Camp to help prepare for Spring and the celebration of Easter! Here is one of the projects you'll be creating at the camp; A Spring Sampler!
Yes, it includes the frame! There are other projects we'll be making that day, and I'll try to share them over the next few weeks. As always, this will be at my home in Spanish Fork and space is limited, so register early (Paypal link below)!
Easter Craft Camp
Saturday, March 16
1 p.m.
$25
**Bring scissors and SNAIL adhesive** (need a refill? Let me know!)


Creative credit: I pulled ideas from many different places as I created this sampler (and even came up with a few of my own!), but would be remiss if I didn't give credit for the ribbon/doily to fellow demonstrator Kirsteen Gill's sampler here as it really makes this home decor project so beautiful!
post signature

Thursday, February 21, 2013

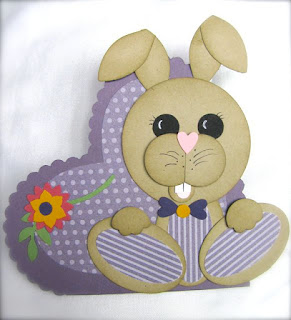
Hopping Down the Bunny Trail

My sweet friend Jan made me this card using Stampin' Up! framelits and punches...so adorable!


post signature

Monday, February 18, 2013

Keeping it Simple

I was inspired by a card from the fabulous Mary Brown and borrowed the sketch for this Sale-a-Bration card featuring the Feeling Sentimental set:
Card recipe: 
  • Stamps: Feeling Sentimental (FREE from the Sale-a-Bration Brochure with $50 purchase), Oh, Hello from Spring Catalog
  • Ink: Summer Starfruit, Raspberry Ripple
  • Paper: Summer Starfruit, Whisper White, Midnight Muse card stock
  • Etc: Occasions Paper-Piercing Pack (129387), Paper Piercing Tool (126819). Stampin' Pierce Mat (126199), Vintage Trinkets (118764), Stampin' Dimensionals


post signature

Thursday, February 14, 2013

Scrapbook Love

I had the opportunity to create a page for my daughter's church group and it was delightful to pause and reflect for a moment on how much joy she brings to our lives! She really is as beautiful as she looks, inside and outside.

Scrapbooking truly builds the self-esteem of children! I've watched my kids share their scrapbooks with friends so many times and they are so proud of every picture. They smile and laugh as they flip through each page. Sometimes they "remember" things they were too young to really recall, simply because it has been documented in their memory album. It makes the effort all worthwhile.

It is a work of love for me, too.

Page Recipe (all supplies from Stampin' Up!):
  1. More Amore Designer Series Paper (129309) and Champagne Glimmer Paper (127885)
  2. Card stock: Real Red, Pool Party, Very Vanilla
  3. Ink: Primrose Petals, Pool Party, Real Red
  4. Paper Doilies (129399)
  5. Typeset Alphabet Bigz Dies (127553), Labels Collection Framelits (125598) and Big Shot (113439)
  6. Pretty Petites stamp set and Petite Curly Label Punch (Sale-a-Bration items: each FREE with $50 purchase)
  7. Punches: Small heart (117193), 3/4" circle (119873), 1" circle (119868), Scallop Trim border (118402), Petite Pennants Builder (122361)
  8. Baker's Twine
post signature

Tuesday, February 12, 2013

Tuesday Treat! Cream Cheese Mints & Cookie Stamps

Sugar is the "other" food group and when you combine cream cheese and sugar, I am in love! When I found a Cream Cheese Mint recipe on Pinterest, I knew I had to try it with the SU! cookie stamps. It gets better: Over at Create with Connie & Mary, the creative challenge was to make a treat holder, AND Valentine's Day is just 48 hours away, so let's start with the finished product, then I'll walk you through it :)

Adorable, huh? My mint cracked after I got it all finished, but that's okay because I have more pictures of the mints along with the recipe, so just hang on...

First, the treat holder recipe (all supplies from Stampin' Up!):
  1. Card stock: Real Red, Pool Party, Very Vanilla
  2. Designer Series Paper: More Amore (129309)
  3. Ink: Real Red (126949)
  4. Stamps: Itty Bitty Banners (Catalog pg. 134)
  5. Ribbon: Pool Party 1/2" Seam Binding (125582)
  6. Pearl Basic Jewels (119247)
  7. Labels Collection Framelits (125598), Hearts Collection Framelits (125599) and Big Shot Machine (113439)
  8. Simply Scored Tool (122334)
And here's a simple tutorial:

1. Score a 3 1/2" x 10 1/4" piece of Real Red card stock at 1 1/4", 5 1/4", 5 3/4" and 6 1/4"
2. Use a framelit from the Labels Collection and place it at the end of your scored card stock with the upper plate just to the 1 1/4" score mark and run it through the big shot. 
3. Adhere a 3 1/4" x 3 3/4" piece of More Amore DSP to the front (the 4" flap without a score mark) and fold along the other score marks, with the center bottom score folding up inside the treat holder. Fold the shaped flap over the top and place your heart framelit under the flap.  
4. Using a post-it note to hold the heart in place, unfold your treat holder and run through the big shot so the heart only cuts through the front:
5. Put your mint or cookie into a small cellophane bag inside the treat holder, fold top flap over and punch through treat bag and add ribbon (you can also cheat and staple the treat bag inside the holder like I did before adding the ribbon). Embellish as desired!
 

Now let's move to the Cream Cheese Mint Recipe!

  1. 8 oz. Cream Cheese
  2. 1/4 c. Butter (softened)
  3. 2 lbs. Powdered Sugar (plus extra for rolling and stamping)
  4. Food Coloring (gel food coloring works best)
  5. Extract flavorings of your choice.
Preparation: In heavy pan, combine cream cheese and butter. Stir over low heat until mixture is soft and blended well. Remove from heat and add powdered sugar. Blend well.

Divide dough into smaller bowls (depending on how many colors/flavors you desire). Add coloring and flavoring to taste. I used Orange extract/orange color, Vanilla/purple and Almond/pink, but you could use lemon, mint, root beer, etc. Mix each bowl with separate utensil so you don't transfer flavors or colors. I found it easiest to mix with my hands, washing in between each kneading. Cover bowls with damp towel when you aren't mixing them.

Line a cookie sheet with wax or parchment paper. Working with one bowl at a time, roll the dough into small balls (about 1 1/2" if using the SU! cookie stamps). If the dough is sticky, mix in a little more powdered sugar. Dust cookie stamp with sugar (to prevent sticking) and press into each ball. Work quickly, as dough can dry & crack...ask a friend or child to help!

Let dry on cookie sheets for 24-48 hours, turning once to let the other side dry, too.
FYI: Original recipe found here.
  

The cookie press stamps come in three different sets and each set includes 3 silicone stamps and a wooden handle for just $16.95. Visit my store to purchase any of the Stampin' Up! supplies listed in today's post and open your pantry to find the rest of the ingredients!

CAUTION: Make sure you have someone to share these with or you WILL eat them all!!!
post signature

Monday, February 11, 2013

Chalkboard and Pinwheels

Blowing bubbles, swinging in a swing, cotton candy, paper pinwheels: There are just some things that bring a smile to your face automatically! 
This card is one we've been making at my stamp clubs and WOW, are people having fun learning the chalkboard technique, too. 

Card Recipe (all supplies from Stampin' Up!):
  1. Card stock: Basic Black, Baja Breeze, Lucky Limeade.
  2. Stamp set: Feel Goods (Spring Catalog, pg 21). 
  3. Ink: Whisper White Craft Pad (101731)
  4. Designer Series Paper: Floral District (126919). 
  5. Pinwheel Sizzlits Die (129411) & Big Shot (113439)
  6. 1/8" Silver Mini Brads (122941), White Embossing Powder (109132), Stampin' Sponge (101610) and white crayon
Click HERE to get the supplies used to make this card!
post signature

Thursday, February 7, 2013

Bloomin' Marvelous In-Color Kit for Sale-a-Bration

Who doesn't love FREE STAMPS? Sale-a-Bration is the most anticipated sale of the year at Stampin' Up! because you can choose a stamp set (or other selected products) FREE with every $50 purchase!

Today I wanted to share a "kit" you could purchase to make (at least) 80 cards with...and get the Bloomin' Marvelous Stamp Set (shown below) FREE!

Here is what the kit contains:
2012-2014 In-Color Kit* (5 Ink Pads & 20 sheets of coordinating card stock)   $29.95
Very Vanilla card stock                                                                         $8.50
Stitched Satin Ribbon (choose from the same 5 colors* above)                        $8.95
Bitty Butterfly Punch                                                                          $15.95
TOTAL (before s&h and tax): $63.35
+ get the Bloomin' Marvelous stamp set free!       

That's less than $1 per card! And here are some of the cards you could make with your Bloomin' Marvelous Kit (which is both the title AND the description!) :


(This last card is an idea borrowed from Mary Fish over at Stampin' Pretty, with my own spin on it)

* FYI: The 2012-2014 In-Colors are: Summer Starfruit, Midnight Muse, Primrose Petals, Gumball Green and Raspberry Ripple and are the colors used on the cards above. 

Surely you'll be able to come up with MORE ideas using the Bloomin' Marvelous Sale-A-Bration stamp set and you can order this kit (and more!) in my online store here. To see more S-A-B products, click on the brochure in the right column!

If you would like make any of these cards, I'd be happy to use the one you like best for a free make-n-take project at a class you host in your home! I only have a few dates left before S-A-B ends on March 22, so contact me ASAP: 801-376-8685
post signature

Wednesday, February 6, 2013

Stamp-a-Stack Card Class, S-A-B Style!

You may notice that my blog is currently undergoing a facelift (thanks to Julie Semones of Webics Designs). There may be a few tweaks over the next few days, but I am excited for the fresh new look!

Meanwhile, I just wanted to invite you to the Stamp-a-Stack Card Class next Saturday, February 16th in Spanish Fork! Here's a sneak peek at one of the 3 different cards you'll be making using some of the products you can earn FREE during Sale-A-Bration:
For more information and to register by February 12th...click here!

Card Recipe (all supplies from Stampin' Up!): Card stock (River Rock, Whisper White, Island Indigo, Pool Party, Calypso Coral, Rich Razzleberry), Ink (Lucky Limeade, Calypso Coral, Island Indigo), Madison Avenue S-A-B stamp set, Sycamore Street S-A-B Ribbon & Button pack, Loving Thoughts stamp set, Calypso Coral Baker's Twine, Big Shot, Top Note Die, Punches (1 1/4" scallop circle, 1" circle, 3/4" circle, 1/2" circle)
 post signature

Monday, February 4, 2013

A Wonderful Wedding Weekend

Really, it could NOT have been a lovelier weekend: My oldest son (Kayson) was married to a beautiful young lady (Whitney) in the St. George LDS Temple!
The best part of the weekend, I think, was that my father married them :) Now I'm wishing I had taken a picture of my dad with them! What was I thinking? I'll have to take one when they get home from their honeymoon. I am very grateful for the Sealing Ordinance that binds husband and wife together for eternity and for the peace and beauty found in the temple.

Angie Clayson took family photos outside in the GORGEOUS weather (one of the reasons they chose to be married in St. George) after the wedding and while this isn't her photo (I'm sure it will be better than mine), I thought it was so cute:
Next, I have to give my wedding planners/sisters Mindi & Megan a.k.a. Frank (prounouced FRAHHNK) & Howard and my mom a HUGE thank you for the luncheon decorations and my brother-in-law Russ for the location. Mindi has an amazing talent for decorating (as does Megan, but she prefers to be the assistant while Mindi is directing) and I am grateful to be on the receiving end of their talents! They truly went above and beyond the call of duty to make it a lovely event on a SHOESTRING budget, unlike the Father of the Bride 2 clip in the above link :D  I owe them tons of scrapbooking service. And FYI, I did put my Stampin' Up! supplies and Big Shot to good use for some of the decor as you can see the silver glimmer paper monograms in the first photo :)
 
Isn't it beautiful? The colors were Pool Party, White, Silver and Pewter. And can you see those cakes? My sister Megan made the white/strawberry one and the German Chocolate one, which guests RAVED was the best one they ever tasted. I want her to open a dessert cafe in southern Utah. She is that good.

Now why didn't I take a picture with my sisters and mom?!!? Again, I'll do that later and post it so you can see their beautiful faces.

Not to be left out, I must also thank my brother Ryan and SIL Alison, my in-laws Launa & Dixon, my best friend Kelli and my BIL Neal for running last minute errands, making/buying cakes, gathering canning jars, helping to clean up, serving and babysitting services! You all contributed to making it a perfect day!
After the ceremony, we just held a family luncheon (no formal reception was held) and here are the happily married couple cutting the wedding cake:
My heart is full from the beauty of the day and the service my family provided. Thank you, thank you, THANK YOU!