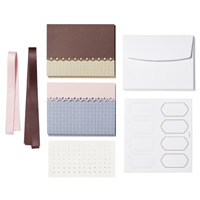
This fun addition to the Simply Scored will be available in the Spring Mini catalog (which goes live NEXT WEEK!)

Friday, December 28, 2012
Thursday, December 27, 2012
Holiday Hiatus and Fancy Friends Kit
With all my kids home this holiday and trying to plan a wedding, I've taken a bit of a hiatus from my blog...I hope that you've enjoyed family time this season and created many happy memories, too!
But I don't want you to think that I'm gone for good, so I'll be sharing a few videos over the next few days from SU! ~ starting with the new Fancy Friends card kit!
You can order this in my store for just $15.95 and includes EVERYTHING you need to create these cards (except glue dots) AND don't forget about the Clearance Rack Blitz there, too...15 new items were added TODAY!
Sunday, December 16, 2012
Friday, December 14, 2012
Shimmer & Shine
If I were a drinker (I'm not), I would try champagne just because I love the name. Come on, say it with me: "SHAM-PANE". Champage, Champage, Champage...say it three times and click your heels together and you'll be taken to a wonderful castle in a cloud! Okay, maybe not, but drink in this beautiful card created with the Champagne Glimmer Paper (Item 127885) and Very Vanilla card stock (this week's color challenge over at Create with Connie and Mary~CCMC230):
 Must say I adore how the Crumb Cake Seam Binding Ribbon (Item 122332) matches so beautifully, tying all the elegant elements together :) I used the Stripes embossing folder (Item 123128) for the background, used the Label Collection Framelits to cut the focal points and embossed the New Year's single stamp (Item 132336) in gold. This stamp is fabulous because you can use it year after year. I'll be using this card for many upcoming events!
Check out more of the single stamps by clicking on the link on the right (only available through January 2, 2013) and of course, the Clearance Rack Blitz!


Check out more of the single stamps by clicking on the link on the right (only available through January 2, 2013) and of course, the Clearance Rack Blitz!
The Blessings of Procrastination: Clearance Rack Blitz!
Well, if you've waited until now to do your Christmas shopping, your procrastination has paid off! It's time for the Stampin' Up! Clearance Rack BLITZ!


 These are just a SAMPLING of what has been added, so go to my online store and get the biggest bang for your buck when you click on the "Clearance Rack"!!
Over 300 new Clearance Rack items are being added to the Online Store at
discounts up to 80 percent off retail ~ only while supplies last! And for
the first time ever, stamps are included at up to 40% off! Just a note: the classic stamp pads that are on sale are the fabric ones, NOT the new firm-foam pads.
Still looking for some great gifts? Check out the Simply Sent or Simply Scrappin' Kits that make paper crafting super SIMPLE (hence the name)...these are just a few examples:
Sweet Moments Simply Sent Kit
Originally $13.95...Preferred Pricing $5.59 in the Clearance Rack!
Party Animal Simply Scrappin Kit
Originally $21.95...now $8.79!
Ready to move past the holidays and think about Valentines? We've got you covered in the Clearance Rack...imagine the possibilities with these supplies:
Designer Cuts Cards and Envelopes
(picture these with some Red Glimmer paper peeking through the laser cut images...WOW!)
Originally $9.95...now just $1.99!
Pleated Satin Ribbon
(Multiple colors available)
Originally $6.95...in the Clearance Rack for $1.39
Originally $5.95...now only $3.59
Wednesday, December 12, 2012
Dress Up a Holiday Gift Card
The sketch over at Create with Connie & Mary this week gave me an idea: A hidden gift card pouch! Here's my card for the CCMC 229 sketch:


Friday, December 7, 2012
Curled Paper Bows
Welcome back to my creative wrapping week! If you've missed some of the posts this week, make sure to catch up so you can get your Christmas Gifts wrapped in style :) And I'd love to have you join me for the TP Tube Challenge I posted yesterday!
Years ago my mom started a wrapping paper business where she sold industrial-sized rolls of gift wrap, the metal cutters and oodles of ribbon. As a paper-addict, I was in heaven! Eventually I followed in her footsteps and worked the business for a while until I found Stampin' Up! Anywhooo...that's where I learned this lovely little technique to make a curled paper bow from your gift wrap:
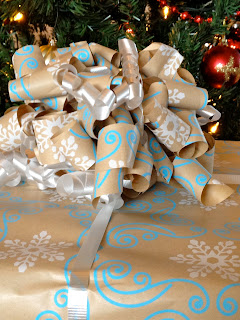 Wrapping paper is super-easy to curl because it is light-weight paper, but I am teaching you the technique using SU! Designer Series Paper (Be Of Good Cheer~126896)
1. Start with a piece of wrapping paper or DSP. This is a 12x12 piece of DSP and you begin by folding it in half. If using a rectangle, fold it in half the long way, or "hot dog" fold. My favorite size is about 18" x 12" for a large package, but don't worry about the measurements...just grab a piece of paper from your printer and follow along!!
 2. Take the open edge and fold it up toward the folded edge, leaving about 1" along the folded edge.
 3. Cut from the bottom fold up toward the center fold, just through the open end edge, all the way across, about 3/4" to 1" wide. No need to measure, just start cutting :)
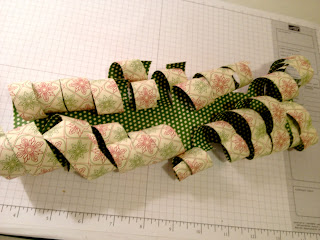
 4. Once you are finished, unfold the whole paper and you will have "spider legs" on both sides with a fold down the middle, like this:
 5. Now the fun begins! Use your scissors and "curl" the paper as you would a ribbon, with the pattern you want to show the most of on the opposite side of your scissors. As you are curling, you may pull off one of the "legs" (see the one in the background of the picture?) No worries: You will never notice it when it is finished!
 6. When you are done curling, your paper or gift wrap will look like this:
 7. If you are using gift wrap, just SCRUNCH it together up the middle fold to gather it. Using DSP (which is a little heavier) you may find it easier to fan fold it as you go along. The cuts you made make it pretty simple to do quickly. Again, this isn't rocket science, so you don't have to be exact, just fold it and go! Then grab an old bread twist tie (doesn't matter what color...mine is BLUE!) and wrap it around the gathers/folds and twist to secure.
 8. Once your bow is secure, just mush it around until looks like a big fluffy bow and tape it to your gift and add a tag! This tag was stamped in Cherry Cobbler Ink (126966) with the Dec. 25 image from the Tags 'til Christmas stamp set (wood~120847 or clear~121169), punched with the Decorative Label Punch (120907) and adorned with Champagne Glass Glitter (120997), all of which can be ordered from my website

Years ago my mom started a wrapping paper business where she sold industrial-sized rolls of gift wrap, the metal cutters and oodles of ribbon. As a paper-addict, I was in heaven! Eventually I followed in her footsteps and worked the business for a while until I found Stampin' Up! Anywhooo...that's where I learned this lovely little technique to make a curled paper bow from your gift wrap:

1. Start with a piece of wrapping paper or DSP. This is a 12x12 piece of DSP and you begin by folding it in half. If using a rectangle, fold it in half the long way, or "hot dog" fold. My favorite size is about 18" x 12" for a large package, but don't worry about the measurements...just grab a piece of paper from your printer and follow along!!


Thursday, December 6, 2012
TP Tube Wrap: Another Up-cycled Project and Challenge
Nothing is more annoying than going to the restroom to find an EMPTY roll of Toilet Paper in the holder.
"WHO do they think is going to replace this??" I grumble. "The TP Fairy? SHE DOESN'T EXIST!!"
Well when you see today's wrapping project, you may imagine I've changed my attitude and now I'm like: "Hooray! Another craft project waiting for me!". Okay, you could IMAGINE that, but it still annoys me that nobody else will change the paper. And when I got to work the other day, there was NO TP on the double rolls in either the men OR the women's restroom and it bugged me. Big time. That's just crap. Literally.
But let's look on the bright side here: You can get back at them by using the empty rolls to create really cute gift containers!

In case you can't figure this out, here are some simple instructions:
Cut a piece of Designer Series Paper 4.5" x 6.5" (I've used some from the Be of Good Cheer pack, 126896). Cover one side with Multipurpose Liquid Glue (110755) and roll it around your TP tube.
 Once the roll is covered, just push in one end like this:

 Now would be the time to put your gift into the open end of your tube. Chocolate and caramel fit nicely inside this little container. As does money. And diamonds. I guess I'm preaching to the choir since there aren't many men who read my blog, I suspect. So make it to this point and demonstrate to the man in your life how to fill it and make some not-so-subtle suggestions.
Now all you need to do is decorate it and tie a ribbon around it to keep it closed:
 You know, these are small and light enough you could decorate your tree with them!
So now it's your turn. Share your TP Tube creations (SU! products always preferred) in the link tool below by December 13th at noon (MST) and I'll choose a winner who will get this gift mailed to them filled with something fun!
"WHO do they think is going to replace this??" I grumble. "The TP Fairy? SHE DOESN'T EXIST!!"
Well when you see today's wrapping project, you may imagine I've changed my attitude and now I'm like: "Hooray! Another craft project waiting for me!". Okay, you could IMAGINE that, but it still annoys me that nobody else will change the paper. And when I got to work the other day, there was NO TP on the double rolls in either the men OR the women's restroom and it bugged me. Big time. That's just crap. Literally.
But let's look on the bright side here: You can get back at them by using the empty rolls to create really cute gift containers!

In case you can't figure this out, here are some simple instructions:
Cut a piece of Designer Series Paper 4.5" x 6.5" (I've used some from the Be of Good Cheer pack, 126896). Cover one side with Multipurpose Liquid Glue (110755) and roll it around your TP tube.


Then the other side on the same end.

Now all you need to do is decorate it and tie a ribbon around it to keep it closed:

So now it's your turn. Share your TP Tube creations (SU! products always preferred) in the link tool below by December 13th at noon (MST) and I'll choose a winner who will get this gift mailed to them filled with something fun!
Wednesday, December 5, 2012
It's an Ornament! It's a Gift! It's a Kit!

The Ornamental Elegance Kit (132832) is $14.95 and includes:
- Die-Cut Cardstock Elements
- Cherry Cobbler 3-1/2" Scalloped Tulle Ribbon
- Natural Linen Thread
- Vintage Faceted Designer Buttons
- Large Pearl Basic Jewels
Tuesday, December 4, 2012
Up-cycled Treat Tubes & Luminaries
You know these little plastic containers that Stampin' Up! buttons and brads come in?
 Have you ever hesitated before throwing an empty one away thinking, "There must be some way to use this..." or, if you are like me, you just save them knowing that inspiration will strike and you'll find a way to Up-Cycle them :) Then you'll love this idea!
This is a container I made by cutting an 8.5" x 4" strip of the flocked window sheet from the Candlelight Christmas Specialty Designer Series Paper (126901) and making it into a tube with Sticky Strip. Fit the tube into the bottom piece of the plastic button/brad container and then decorate as desired:

 While my tube was 4" tall, you could create any height tube, keeping the width 8.5" to make your tube, which is the perfect size to create a tube to fit into the containers you are up-cycling. Depending on how close to the edge you glue your tube, it may fit perfectly inside the bottom of the brad/button container OR if it is too large, slide it over the outside of the container. Then decorate it as desired and fill with something delicious, like home-made fudge!!
I also created a luminary by punching out a shape before making the tube and covering the opening with vellum and a stamped image. I left off the lid on this one...just drop in a battery operated tea light and you are good to go! This one has a ribbon handle so I can hang it somewhere:
 See you tomorrow for more fun Holiday packaging and gifts from your Stampin' Up! stash!
This is a container I made by cutting an 8.5" x 4" strip of the flocked window sheet from the Candlelight Christmas Specialty Designer Series Paper (126901) and making it into a tube with Sticky Strip. Fit the tube into the bottom piece of the plastic button/brad container and then decorate as desired:

The top of the button/brad container makes a perfect lid for your tube! I created a Real Red paper flower for this one using a few scallop circle punches and added a little bling with our Rhinestone Jewels (119246):

I also created a luminary by punching out a shape before making the tube and covering the opening with vellum and a stamped image. I left off the lid on this one...just drop in a battery operated tea light and you are good to go! This one has a ribbon handle so I can hang it somewhere:

Monday, December 3, 2012
A Disney Proposal
I have a good reason for being absent for a week: I've been in the MERRIEST Place on Earth!


It was a wonderful vacation with my whole extended family and while we were there, my son Kayson arranged this for his girlfriend Whitney:

She's the one in the front, oblivious to what is unfolding behind her until she sees the preview picture:

So yes, there is a wedding in our future!
Here are a few more highlights of the vacation, and then come back every day for the rest of the week for some creative gift wrapping and gift giving ideas from Stampin' Up!


Subscribe to:
Posts (Atom)