Showing posts with label Simply Scored. Show all posts

Friday, October 4, 2013

Bottle Bib Pocket: Whip One Up In a Jiffy (Video Tutorial)

Waiting in line at the Cal Ranch store in Spanish Fork, I saw a display of awesome bottled pop. One that caught my eye was called, "Dang! That's Good" Root Beer...even the bottle cap was cute! The colors effused FALL and the Stampin' Up! Sweater Weather came to mind. So I grabbed a handful of bottles and decided I'd figure some way to use them :)

Then I went shopping and saw the Caramel Apple bite by Russell Stover and if you know me well, I'm an even bigger sucker for CARAMEL than I am for chocolate (and that's sayin' something). So I put another handful in my cart and whistled all the way home!

My solution? What I call a "Bottle Bib Pocket"! It was actually inspired by a project made by my friend Pam Clyde, whose artistry is beautifully detailed. I'm more of a quick and easy crafter, but I think you'll like both :)


I made a video tutorial for the simple one...I'll let Cal Ranch know they better stock up on "cute" soda pop :D I suspect it tastes as good as it looks, but I don't know as I've been giving all mine away to my Stampin' Up! hostesses as I demonstrate them! Want me to teach you and your friends? Book a party during October!


post signature

Monday, March 18, 2013

A Happy Hello/Goodbye Sale-a-Bration

5 days left of Sale-a-Bration and I've had fun demonstrating these boxes at my March parties from the Happy Hello Card Kit:
The instructions for the boxes are on Barb's website HERE...and my only change/suggestion to make it easier is to put your card on the Simply Scored with the flat side flush against the left side and score at 1", then flip the card over so the other flat edge is flush against the left side and score again at 1". Turn the card so the blue chevrons are on the left edge and score down the edge of the pattern at 3".

I used a clear envelope with the sticky flap cut off for the "bag" inside the box and filled it with chocolate, my favorite treat.

They are really fun to make, but since the kit comes with 8 cards and envelopes (and everything else to make these cards)...
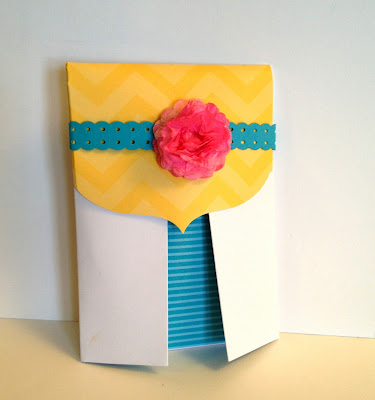
...I had a lot of these cute envelopes left over! What to do with them?? So I came up with this:
It's a gift card holder!
Here are the simple steps to make your own:

1. Cut white card stock 2-3/4" x 9-3/4". Score at 1-7/8" and 5-7/8" on the Simply Scored Tool (122334).  Punch a half circle (I used the 1-3/8" punch) on the smaller flap edge and the Scallop Trim Border punch (118402) on the larger side edge. Adhere sticky strip to the very edge of the smaller flap sides.
2. On the opposite side of the card stock, stamp your image. NOTE: This image is from the Carry On set which is only available when you host a party and will be retired at the end of May...call me today to schedule a private class :)
3. Remove red from sticky strip and fold in to create pocket. Add a small strip of colored card stock under the decorative edge and mount the pocket to a 4-1/4" x 3" piece of card stock.
4. Take the envelope from the Happy Hello Sale-a-Bration card kit and score at 1-3/8" and 4-1/2" using the Simply Scored.
5. Insert a 3-3/4" x 3" piece of Designer Series Paper into the scored envelope and mark with pen so you know where to trim:
6. Remove the DSP, trim and adhere to center front section of envelope. Trim into the envelope flap along score lines, fold and adhere to sides (or remove). Insert card into envelope.
7. Punch 8 layers of Creped Filter Paper (129393) using 1-1/4" scallop circle punch (127811) and push brad through the center of all circles. Scrunch each layer up to form flower. Spray flower with Stampin' Spritzer (126185) filled with rubbing alcohol and 4 drops of re-inker (I used Melon Mambo). Create a belly band with the Dotted Scallop Ribbon Border punch (119275) and insert flower brad to secure in the front.
Voila! A beautiful way to present a gift card AND use up those gorgeous envelopes from the Happy Hello Card Kit from Sale-a-Bration!
to purchase the items used in this tutorial and get the Happy Hello Card Kit FREE when you spend $50...but hurry! It's only available through Friday, March 22nd when we must say GOOD-BYE to Sale-a-Bration 2013 :(
post signature

Friday, December 28, 2012

Simply Scored Borders: Spring Catalog Peek!

This fun addition to the Simply Scored will be available in the Spring Mini catalog (which goes live NEXT WEEK!)

Friday, November 9, 2012

Two-for-One Challenge: Feeling Autumnal

Serendipity! I made this card yesterday for the Create with Connie and Mary color challenge and woke up to discover that it kind of fits the Clean & Simple sketch #216 scallop challenge too :) Since I haven't made nearly enough fall/autumn cards, I was very pleased with how it turned out and the champagne glimmer paper makes me so very warm inside:

I adore the Autumn Accents Die for the Big Shot to make my own leaves and I used the Simply Scored to give the leaves veins. The DSP is from the Comfort Cafe package.  

It was so fun to create last night, but here is what my desk looks like this morning:
And my kids think there should be food in the fridge, so I guess I'll be cleaning and shopping today instead of crafting :( As my Father-in-Law is fond of saying, "Just when you teach 'em to eat dirt, they up and die on you." No bueno!

Friday, October 12, 2012

Jolly Christmas Card Video Tutorial

Break out your Simply Scored and join along as Stampin' Up! shows you how to make a fun Holiday Card!

Saturday, June 16, 2012

Diagonal Fold Card Tutorial

Today I am sharing a fun card and envelope tutorial that uses the Simply Scored and Diagonal Plate from Stampin' Up! If you are visiting to see the long envelope tutorial, you can see it here...but stick around for a minute to see this fun fold card, too! We'll start with the card front:
 
The finished card is 4"x4" and opens like this:
To create this card, use a piece of 12"x4" card stock (I used Marina Mist). Score it at 4" and 8" on the Simply Scored, then put on your diagonal plate and score diagonally at from the top corner and at the 8" mark. Fold the straight score lines in toward the center of the card and then fold the triangle folds BACK away so that two folded edges meet in the center of the front of your card.

Cut your Designer Series Paper to 3.5" square and cut in half diagonally to put on the front of the card inside the scored diagonal areas. I used the Nursery Nest DSP which has been retired, but try any of our fun NEW Designer Series Paper and create your own!

Next, create a 3"x3" focal point (the baby feet on this sample) and when you are adhering it to the front of the card, ONLY use adhesive in the bottom left corner/triangle so that your card can open! For my focal point, I did the emboss resist technique with the Baby Prints stamp set: Stamp baby feet on white card stock using Versamark ink and emboss in white (or clear). Sponge ink over cooled, embossed image and wipe off the excess with a tissue: Voila! Your feet appear magically!

Of course, this card needs a special envelope, so I created a matching one with the Simply Scored tool and Diagonal Plate (for tutorial, click HERE): 

Monday, June 4, 2012

Long Envelope Tutorial

UPDATED 6/6/12: Thanks to Mary Fish of Stampin' Pretty, she let me know that the minimum envelope width for mailing is 3 1/2" and she suggested a few adjustments to the envelope measurements, which are now reflected in the following instructions!

When you cut a piece of 12x12 card stock into quarters, you can create FOUR 6x3 cards, like this one created from a new set called "Betsy's Blossoms"
And here is how to create a beautiful envelope to match! 

First, cut a piece of Designer Series Paper 7.5 "x8.5" (this sample created with the new Floral District DSP). With the 7.5" side along the top of your Simply Scored tool, score at 1 3/8" and 4 7/8" 
(red lines shown below) 
Hint: the Simply Scored tool has grooves and marks every 1/8 inch!
Turn the paper so the 8.5" is along the top of the Simply Scored tool and score at 1" and 7 1/8"
(Green lines shown below)
Now you can trim off each corner along the score marks (or use the 1 3/8" square punch...it works perfectly!)
Your envelope will now look like this:
Optional: Use the 1 3/8" circle punch and insert the top and bottom tab corners in the back to round the corners like this:
Now it looks like this:
Fold over the side pieces and adhere first, then the bottom flap folds up:
Voila! it fits your 6x3 card perfectly!
(Finished Envelope size is now 3.5" x 6 1/8")


Thursday, May 24, 2012

DIY Envelopes

My apologies for being absent for so long! What could I blame it on?? End of school? Yard work? A Solar Eclipse?
Yes to all of the above, but that is no excuse, really. If you have been following my Facebook Page, you'll know that I have been pretty faithful with the Retirement Parade this month (a card each day showcasing the Stampin' Up! sets that will be retired in less than a week now!!).

I have been thinking about sharing this for a while, so today I want to give some hints for creating your own envelopes with the Simply Scored and Diagonal Plate. First, a video from Stampin' Up!
 (Or if you are in too much of a hurry to watch the video, scroll down for a quick picture of how to create envelopes with the Simply Scored Diagonal Plate)


Simply Scored Envelopes

The Diagonal plate comes with measurements for a few basic cards, so let me share a quick reference for some other envelope sizes: Mary Fish (of Stampin' Pretty) has created a fabulous chart HERE...print it off and then come back to add these sizes:

* For a 6x6 card size, the finished envelope is approx. 6 1/4" square. Cut your paper to 10" square and both "A" and "B" scores are at 4 1/2"  (BONUS: I'll be demonstrating this envelope along with a scrapbook page you can mail at my JUNE workshops, so book yours today!)

* For a 2x2 card size, a finished envelope is approx. 2 1/8" square. Cut your paper to 4" square and score at 1 5/8" on both A and B sides. I love to make these envelopes using vellum and the cards are a petite size for gift giving :)

REMEMBER: Some of these envelope sizes are too small to mail, so they must be given in person, allowing you time to visit with a friend as you deliver your thoughtful hand-crafted gift :)
Envelope on front of card
Coming soon: A NEW envelope tutorial that you won't want to miss!


Tuesday, March 6, 2012

Simply Scored Diagonal Plate


I am sure having fun with mine and will be showcasing it in my April Workshops!

Tuesday, September 20, 2011

A New Best Friend (in your Craft Room)!

9/25 Update...Apparently I had the wrong link which prevented you from visiting my blog...I hope this fixes it! Sorry :)

Hello friends! Apologies for being quiet for so long...my husband and I went on a much needed vacation, thanks to Stampin' Up! and I promise I will share some photos soon from Prince Edward Island :)

Meanwhile, we are still without internet at my house :( so it makes it challenging to update often here. I try to update my Facebook Fan Page (Creative Juice by Loni Spendlove) more often as it is a little easier. In fact, I shared this video there this morning...thanks to fellow demonstrator Robin Feicht, you can discover your new best friend (and what is better than a best friend WITH CHOCOLATE?)

Need one? This fabulous tool is available in the Holiday Mini Catalog and you can order one on my website or schedule a workshop and you could get it FREE with your hostess dollars! My fall calendar is filling fast, so call 801-376-8685