Showing posts with label Framelits. Show all posts

Friday, May 1, 2015

Colors, Mashups, Retirement and Special Card

Give me a good challenge...or three...and set me loose! Today I was anticipating the opportunity to join the inagural challenge over at TGIF Challenges with the uber-talented Mercedes and her "dream team" of creators and serendipity happened when the Friday Mashup gave me an excuse to use my Chalk Talk stamp set once more before it retired! Here are the challenges~ A color combo, sketch and retired set:


And this is my creation:

Built for Free Using: My Stampin Blog

That was fun~ I may have been a little excited to be the VERY first TGIFChallenge entry...it's a stampin' thing, I guess!!

Chalk Talk was one of my favorite retiring stamps and if you love it, get it today in my store! I've shared a few other projects using this soon-to-be-gone set on my Creative Juice by Loni Facebook Page ...join me there for daily inspiration, fun and creative juice. 

post signature

Tuesday, December 2, 2014

Invite Christmas JOY and Extravagant Ooops

Let's start with the "Ooops"...how did I NOT tell you about the Stampin' Up! Extravaganza sale here on my blog? Probably because I put it on my Creative Juice Facebook page and thought I had covered my bases >:p
And yes, today is the last day!! (Click on the image to shop in my store) 

Sorry for that...but to make up for it, let me tell be the FIRST to tell you that there will be a new year-end closeout sale on the Clearance Rack from December 5-January 5!  I may be late for one, but at least I'm early for the next one :D   Unfortunately, they don't overlap, but there are some awesome deals in both. And of course there are new weekly deals every Tuesday...they show up over in the right column --->

On to the Tuesday Tutorial! This is an ornament I created that could also double as a small wreath for your door:

The "wreath" is actually a candle dish from Ikea and has felt bumpers on the back, so it won't bang against your door. It's super easy to make, too! Download the tutorial here and invite some JOY into your house this Christmas season.

post signature

Tuesday, November 11, 2014

Four Feathers Thank You Card Tutorial

'Tis the Season for giving thanks, and this fun card is perfect because it can be used for men or women! With just a few products needed, you could create a stack of these to have on hand this month. Click on the picture to download a .pdf tutorial and let the feathers tickle your fancy!
(Original Card by Sharon Armstrong)
post signature

Monday, October 20, 2014

Starburst: Merry & Bright

Ooops...I missed last week's Tuesday Tutorial, so I'll share two this week (kind of).

It was my pleasure to demonstrate the Starburst (or Sunburst) technique last week at Jill Olsen's Stamp Together in St. George and these are some of the cards I showed how to make:
Wanna know what's cool about these cards? I made 4 starbursts all at the same time by cutting a stack of 4 pieces of paper! I used the awesome tutorial by Sharon Cheng here. Seriously easy...go watch it now and remember the measurements for the DSP are 3"x4". The first card stock layer is 4-7/8" x 3-5/8", and the next layer is usually 5-1/4" x 4", then the card itself (a half sheet of 8.5" x 11" paper, folded in half). 


I cut the star with the Stars Framelits and Big Shot, then scored with my Simply Scored board (on the silver side) of the star from point to opposite indentation, on all points. Then just fold and mount on some Stampin' Dimensionals :) So shiny!

They are even sparklier in person!
Built for Free Using: My Stampin Blog

In case you can't get enough stars, check out the new Many Merry Stars Kit from the new Holiday Supplement...and the fun project ideas for this and other products on the Pinterest board HERE.

post signature

Thursday, August 7, 2014

Is it too early for Christmas?

My husband and I enjoy Sunday afternoon drives and not long ago we noticed a few homes with Christmas lights still up...then I pointed out we can't say "still" because after June 25th, we are officially on the downhill slide toward the holidays = Now we should consider these merry folk "EARLY" with their decorating! So I'm just helping you get a jump on the holidays and help you create some lovely greeting cards EARLY with the Big Shot August Special and the Bright & Beautiful stamp set and framelits:

Card Recipe (All supplies from Stampin' Up!): 

Stamps: Bright & Beautiful stamp set (Holiday Catalog!)
Ink: Silver Encore pad (132142)
Paper: Whisper White and Smoky Slate card stock, Silver Fancy Foil Vellum (133364), Silver Foil Sheets (132178)
Accessories:  Stars Framelits (133723), Big Shot, 1/8" Silver Ribbon (132137), Lucky Stars Textured Impressions Embossing Folder (132817), Silver Embossing powder (109131), Rhinestone Jewels (119246)

And special thanks to Create with Connie and Mary for the beautiful sketch challenge this week (CCMC315)...it was perfect for this card!

post signature

Friday, August 1, 2014

Everything is AWESOME...in August: Big Shot with FREE Bundles!

Hear that? It's the sound of summer speeding by...and I'm not going to bore you with my excuses for being absent today. Instead, I'm going to shout that EVERYTHING IS AWESOME in August!
www.blog.thecraftyowl.co.uk/post/2014/02/25/Everything-is-Awesome!-Lego-Movie-Punch-Art
(This card was created by UK SU! demonstrator Joanne James and if you click on it, it will take you to her blog, with the supplies she used to create it.)

WHY is August so AWESOME, you may ask?
http://bit.ly/bigshotbundle
That's why! If you don't have a Big Shot, you must consider it an essential Back-to-School tool to purchase this month--The bundles essentially make the machine 1/2 price! And if you are one of the wise crafters who already own a Big Shot, you can save 15% when you purchase the bundles separately from the machine.

Here are my Top 5 reasons to love the Big Shot:
  1.  The Big Shot cuts and/or embosses, taking your projects to a new level of lovely. 
  2. It can cut shapes from over 70 materials (including fabric, magnet sheets and pop cans, so you are being GREEN when you use it and recycling, too)
  3. The Big Shot is super easy to use...and cranking the handle counts as (light) exercise.
  4. It doesn't need electricity (So when the power goes out, the crafting continues)!
  5. The framelits that coordinate with the stamps solve the challenge of cutting out by hand and seriously, that's worth it's price in gold.
I'm off to make you some cute samples that will make you NEED the Big Shot... or if you are ready to discover crafting Nirvana today, go to my stampin' store to place your order :)
post signature

Thursday, April 18, 2013

Changing Shape

Who says greeting cards have to be square (or rectangle)? I pulled out my Oval Framelits to create this fun card for my stamp club tonight:
Card Recipe (all supplies from Stampin' Up!)
  • Stamps: Oh, Hello set (Spring 2013 Catalog)
  • Ink: Island Indigo, So Saffron, Garden Green
  • Paper: Very Vanilla, Island Indigo, So Saffron, Tea for Two DSP (129311)
  • Accessories: Big Shot (113489), Ovals Collection Framelits (129381), Designer Builder Brads (129329), Itty Bitty Shapes Punch Pack (118309), Victoria Crochet Trim (118481), Occasions Paper Piercing Pack (129387), Stampin' Pierce Mat (126199) and Paper-Piercing tool (126189)
You can order the supplies to create this card (and so many more!) in my store!
post signature

Thursday, March 14, 2013

Framelits: A Gate-Fold Card Tutorial VIDEO

HOLY COW! I *seriously* underestimated the time it would take to make (and edit!) a video tutorial!I have been reluctant about starting videos because I knew they would take time...I just had no idea HOW MUCH time they would take :p

Now my complaining is out of the way, I am pretty pleased with it. Like having a baby: Perhaps the amount you love them is commensurate in some way to the amount of pain you go through to bring them into (and keep them in) the world!!

Before the tutorial, let me show you the superbly adorable and infinitely superior cards I created...no need to organize a parade...a simple kind comment will suffice :)
Without further ado, I present unto you my first-born video tutorial!


Whew! I feel like I may need nine months of recovery before I try another one...or maybe I just need to hire someone who can edit video and do graphic design for me...

In other news, I had a total mother PAYBACK yesterday with my eldest son! It was such a beautiful day to hear him say, "My mom is always right" and tell me how blessed he feels. Those moments are worth everything we went through to hear it! Life is good :)
post signature

Tuesday, March 12, 2013

Oh Hello

When was the last time you sent a card to a friend "Just Because"? Getting a hand-stamped card in your mailbox makes you feel so loved! Who do you know that needs one of these cards to brighten their day?
I am really having fun with the Label Collection Framelits (see how to cut the edge of your card in this tutorial) and this time I paired it with the new Borders plate for the Simply Scored to create the raised edge! And can you see the paper-pierced scallop border peeking out from the inside panel? Yep, I pretty much love everything about this card and hope that the friend that gets it loves it too.

Actually, I can think of a few people who need one, so I'll have to make a few more to spread the joy!

Card Recipe (all Stampin' Up supplies):
  • Stamps: Oh, Hello (pg 4 of Spring Catalog)
  • Ink: Lucky Limeade and Primrose Petals Stampin' Write Markers, Crumb Cake ink pad
  • Paper: Card stock~ Primrose Petals, Very Vanilla. Tea for Two Designer Series Paper (129311)
  • Accessories: Label Collection Framelits (125598), Big Shot (113439), Simply Scored (122334), Borders Scoring Plate (126192), Essentials Paper Piercing Pack (126197), Paper Piercing Tool (126189), Stampin' Pierce Mat (126199), Decorative Label punch (120907), Stampin' Sponge (101610), Very Vanilla Seam Binding Ribbon (120999), 5/8" Flower Trim (126869)
Visit SYCJ again tomorrow afternoon for another fun card 
using the framelits!!!!
post signature

Thursday, February 21, 2013

Hopping Down the Bunny Trail

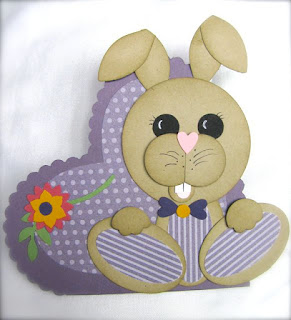
My sweet friend Jan made me this card using Stampin' Up! framelits and punches...so adorable!


post signature

Tuesday, February 12, 2013

Tuesday Treat! Cream Cheese Mints & Cookie Stamps

Sugar is the "other" food group and when you combine cream cheese and sugar, I am in love! When I found a Cream Cheese Mint recipe on Pinterest, I knew I had to try it with the SU! cookie stamps. It gets better: Over at Create with Connie & Mary, the creative challenge was to make a treat holder, AND Valentine's Day is just 48 hours away, so let's start with the finished product, then I'll walk you through it :)

Adorable, huh? My mint cracked after I got it all finished, but that's okay because I have more pictures of the mints along with the recipe, so just hang on...

First, the treat holder recipe (all supplies from Stampin' Up!):
  1. Card stock: Real Red, Pool Party, Very Vanilla
  2. Designer Series Paper: More Amore (129309)
  3. Ink: Real Red (126949)
  4. Stamps: Itty Bitty Banners (Catalog pg. 134)
  5. Ribbon: Pool Party 1/2" Seam Binding (125582)
  6. Pearl Basic Jewels (119247)
  7. Labels Collection Framelits (125598), Hearts Collection Framelits (125599) and Big Shot Machine (113439)
  8. Simply Scored Tool (122334)
And here's a simple tutorial:

1. Score a 3 1/2" x 10 1/4" piece of Real Red card stock at 1 1/4", 5 1/4", 5 3/4" and 6 1/4"
2. Use a framelit from the Labels Collection and place it at the end of your scored card stock with the upper plate just to the 1 1/4" score mark and run it through the big shot. 
3. Adhere a 3 1/4" x 3 3/4" piece of More Amore DSP to the front (the 4" flap without a score mark) and fold along the other score marks, with the center bottom score folding up inside the treat holder. Fold the shaped flap over the top and place your heart framelit under the flap.  
4. Using a post-it note to hold the heart in place, unfold your treat holder and run through the big shot so the heart only cuts through the front:
5. Put your mint or cookie into a small cellophane bag inside the treat holder, fold top flap over and punch through treat bag and add ribbon (you can also cheat and staple the treat bag inside the holder like I did before adding the ribbon). Embellish as desired!
 

Now let's move to the Cream Cheese Mint Recipe!

  1. 8 oz. Cream Cheese
  2. 1/4 c. Butter (softened)
  3. 2 lbs. Powdered Sugar (plus extra for rolling and stamping)
  4. Food Coloring (gel food coloring works best)
  5. Extract flavorings of your choice.
Preparation: In heavy pan, combine cream cheese and butter. Stir over low heat until mixture is soft and blended well. Remove from heat and add powdered sugar. Blend well.

Divide dough into smaller bowls (depending on how many colors/flavors you desire). Add coloring and flavoring to taste. I used Orange extract/orange color, Vanilla/purple and Almond/pink, but you could use lemon, mint, root beer, etc. Mix each bowl with separate utensil so you don't transfer flavors or colors. I found it easiest to mix with my hands, washing in between each kneading. Cover bowls with damp towel when you aren't mixing them.

Line a cookie sheet with wax or parchment paper. Working with one bowl at a time, roll the dough into small balls (about 1 1/2" if using the SU! cookie stamps). If the dough is sticky, mix in a little more powdered sugar. Dust cookie stamp with sugar (to prevent sticking) and press into each ball. Work quickly, as dough can dry & crack...ask a friend or child to help!

Let dry on cookie sheets for 24-48 hours, turning once to let the other side dry, too.
FYI: Original recipe found here.
  

The cookie press stamps come in three different sets and each set includes 3 silicone stamps and a wooden handle for just $16.95. Visit my store to purchase any of the Stampin' Up! supplies listed in today's post and open your pantry to find the rest of the ingredients!

CAUTION: Make sure you have someone to share these with or you WILL eat them all!!!
post signature

Monday, January 28, 2013

A Way with Words

Sometimes words just speak for themselves: That's how I feel about the new "Feel Goods" stamp set in the Spring Catalog! The quotes are uplifting and positive, and don't we each know someone who could use a little encouragement or appreciation? The challenge is sometimes how to create the card with words as the focal point. Here's one idea I wanted to share with you today:
Go ahead, make someone "Feel Good" by sending them a card today!

Card Recipe (all supplies from Stampin' Up!): Pretty in Pink, Early Espresso, Very Vanilla card stock, Early Espresso and Crumb Cake ink pad, Tea for Two Designer Series Paper (129311), Feel Goods stamp set (Spring Catalog pg 21), Labels Collection Framelits (125598), Designer Builder Brads (129329), 1 3/4 Scallop Circle Punch (119854), Itty Bitty Shapes Punch Pack (118309), 5/8" Crochet Trim (118481), Honeycomb Embossing Folder (129378) and Big Shot (113439), stamping sponge (101610) and sanding block (129367) 


Friday, January 18, 2013

Bridal Shower Open House

Last week I had the pleasure of throwing a Bridal Shower for my new daughter-in-law-to-be (that made me feel old while I typed it). Kayson chose a beautiful young woman to marry and we are happy to welcome Whitney to our family!

This was the invitation which matched her wedding colors of Pool Party, Silver & White, and we threw in a pop of Melon Mambo, for fun:
The new Cloudy Day embossing folder (127022) was the perfect addition to the background! I found the umbrella stamp in the Carry On stamp set (a hostess set you can choose when you hold a SU! party) but there is also a really cute NEW stamp set in the Spring catalog called Rain or Shine that would be fun to use, too, in case you are making invitations and want to "borrow" this idea!


I hope you can see this adorable banner that says "WHITNEY": we made it with the new Paper Doilies (129399) from the Spring Catalog and the Typeset Alphabet Die (127553) and the Big Shot, the flower punch from the Itty Bitty Shapes Punch Pack (118309) and a few Rhinestone Jewels, because you know how I feel like everything needs a little bling!
Her sister made red velvet cupcakes and we served our traditional warm "Shower Sandwiches" and fruit. That is Whitney and her mom in the background :)

Since it was Open House Style, we asked people to write advice or solutions to potential problems for Whitney's book (above) and took pictures of Whitney with each of her guests to go into the book I created with SU!'s clear envelopes, card stock and DSP.  For some awesome pre-made (and free!) Problem/Solution Printables get them HERE!  The Label Framelits (125598) made it easy to cut all the advice papers, too, and this is my FAVORITE response:
We also asked guests to write their address on an envelope to make it easy for Whit to send "Thank You" cards and I created a stack of simple cards for her using the Million Dollar Moments set (another Hostess-only set from the Spring Catalog!)


Friday, December 14, 2012

Shimmer & Shine

If I were a drinker (I'm not), I would try champagne just because I love the name. Come on, say it with me: "SHAM-PANE". Champage, Champage, Champage...say it three times and click your heels together and you'll be taken to a wonderful castle in a cloud! Okay, maybe not, but drink in this beautiful card created with the Champagne Glimmer Paper (Item 127885) and Very Vanilla card stock (this week's color challenge over at Create with Connie and Mary~CCMC230):
Must say I adore how the Crumb Cake Seam Binding Ribbon (Item 122332) matches so beautifully, tying all the elegant elements together :) I used the Stripes embossing folder (Item 123128) for the background, used the Label Collection Framelits to cut the focal points and embossed the New Year's single stamp (Item 132336) in gold. This stamp is fabulous because you can use it year after year. I'll be using this card for many upcoming events!

Check out more of the single stamps by clicking on the link on the right (only available through January 2, 2013) and of course, the Clearance Rack Blitz!


Saturday, October 6, 2012

Celebrate WCMD!

Apparently it's not just National Card Making Day, it's WORLD Card Making Day (WCMD)! My bad...
But this is good! I combined the sketch from Create with Connie and Mary:
with my Facebook Color Challenge:
 (Bashful Blue, Baja Breeze, Not Quite Navy, Soft Suede, So Saffron)

 to come up with this masculine birthday card:
Card Recipe (all supplies from Stampin' Up!): card stock and ink colors listed above, You're Amazing Stamp Set (catalog page 33), Apothecary Accents Framelits (#127703),  Big Shot (#113439), 1" circle punch (#119868), Subtles Glimmer Brads (retired). It's good to have a spring-board for creativity sometimes and I was happy with the way it turned out!

If you are making cards this weekend, try my sketch challenge or FB color challenge (or combine them!) for a chance to win a prize :) then go ahead and send a card to a friend...just because.