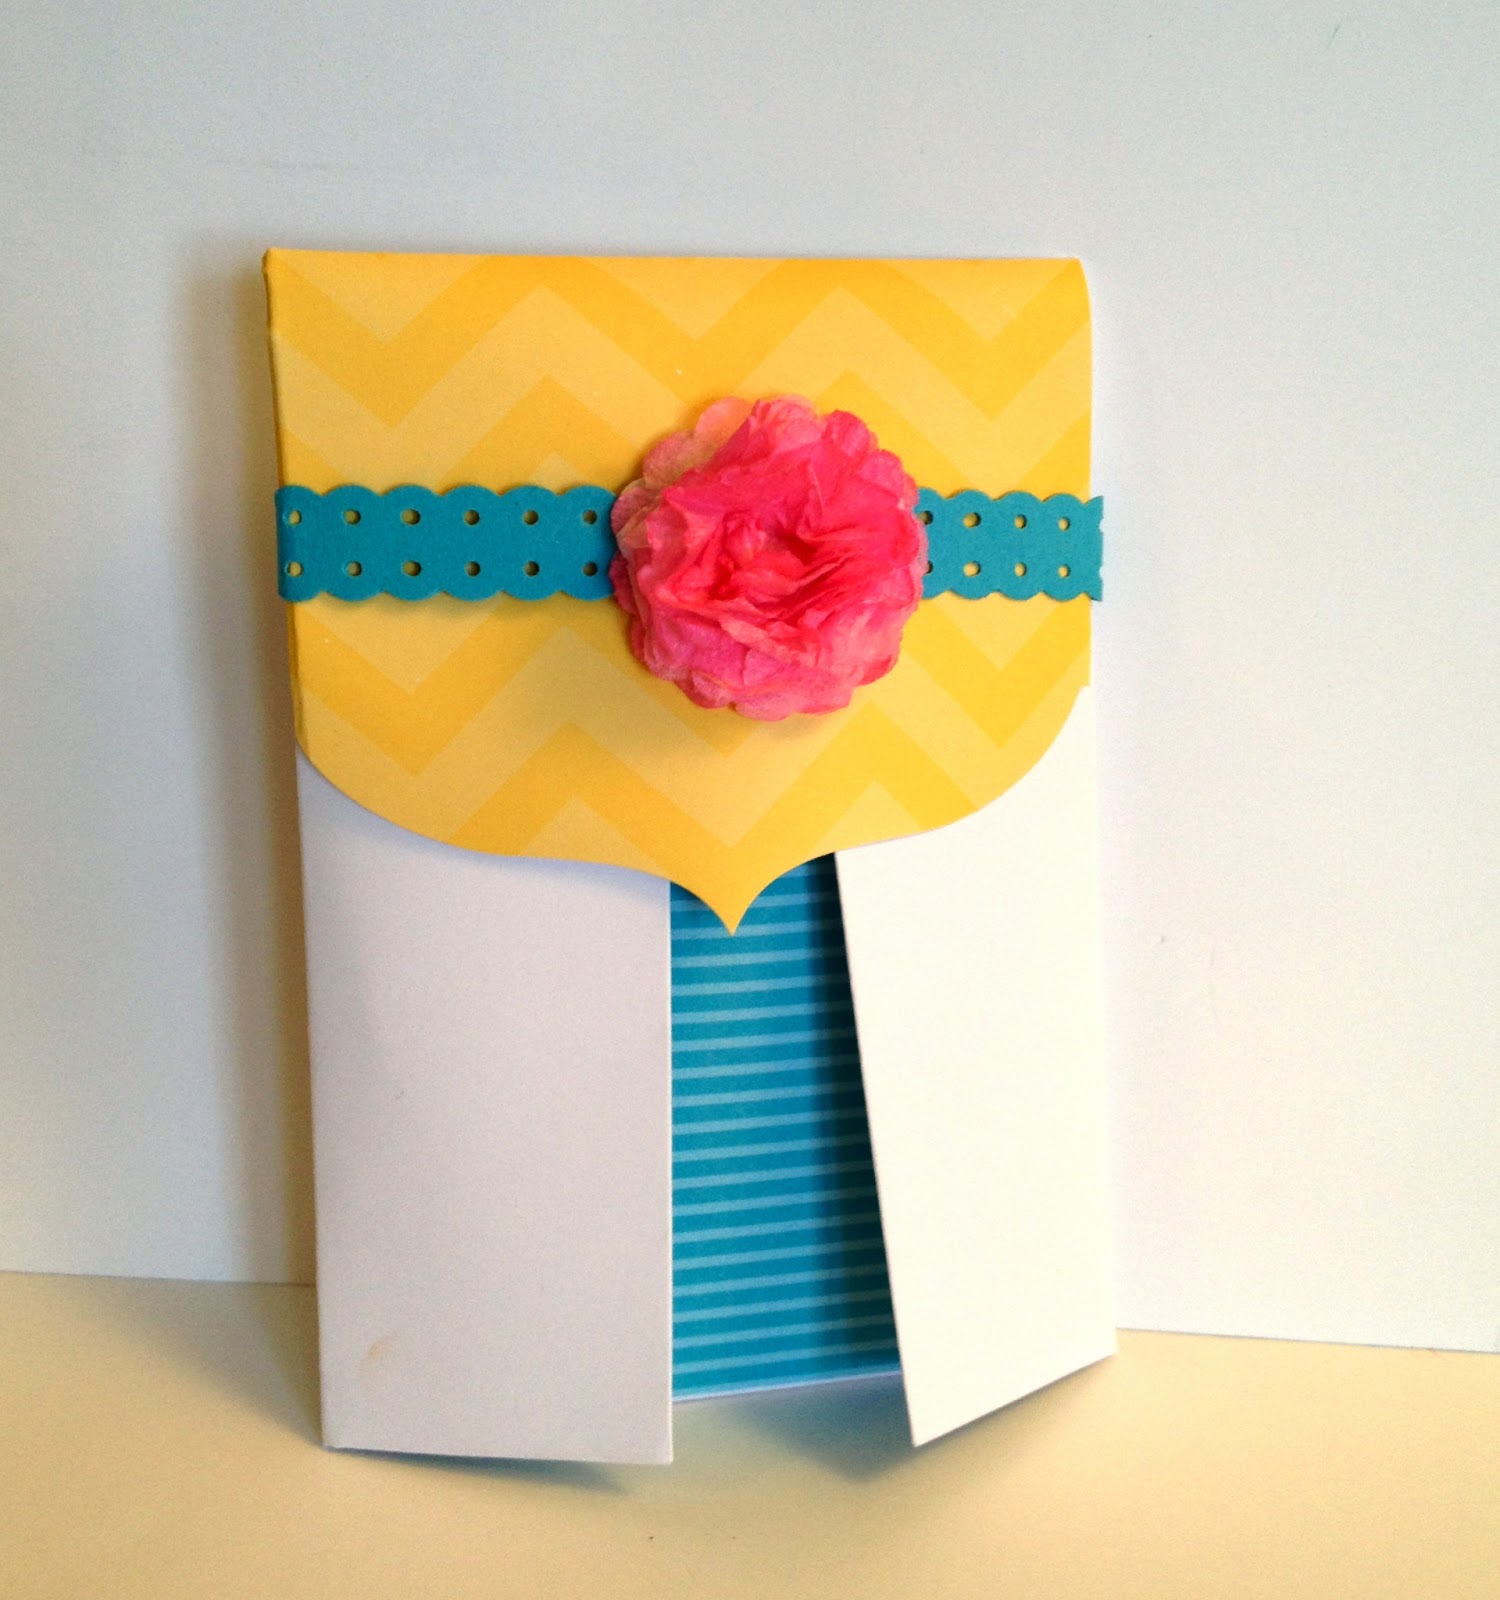
You can click on the photo or HERE for a printable .pdf tutorial. Go forth and create a wonderful September!
Showing posts with label Punches. Show all posts
Tuesday, September 2, 2014
Tuesday Tutorial: Beautiful Bunch Belly Band Card
Isn't this a fun card to kick-off September? I love making belly band cards with the Envelope Punch Board (they are SO QUICK AND EASY!) and this one was designed by my friend Kimberly Myers. I'm happy to be sharing it with you!
You can click on the photo or HERE for a printable .pdf tutorial. Go forth and create a wonderful September!
Thursday, April 3, 2014
Easter Eggs and Memory Albums
Look at me! I actually finished a project BEFORE the holiday! Feeling pretty good right now :) These little Easter Egg "thrones" are such fun to make with a few punches, stamps and the Big Shot!
So I don't have time to make a lengthy tutorial, so let me give you a few tips for making them:
- Cut a 8.5"x2.5" strip from one end of your card stock and score it (down the long edges) at 1/2" and 2" (the Simply Scored board--item #122334--makes all your scoring SUPER SIMPLE). Then chop it up into 2"x 2.5" pieces and punch a hole using the 1-1/4" circle punch (#119861) in the middle like this----->>>>
- Cut the rest of the card stock into 2"x8.5" strips. Score them at 3.5" and 5". Punch the ends with the Scallop Tag Topper Punch (133324).
- Line up the Designer Frame embossing folder (#123130) with the first score line from one end and run through the Big Shot --->>>>>
- Punch the middle of the embossed frame out with the Large Oval Punch (#119859)
- Adhere the "throne" piece between the two sides with SNAIL adhesive, add egg and embellish as desired! I used the flowers and punch from the Petite Petal bundle (#134821-wood or #134822-clear mount). As always, you can purchase these supplies from my Stampin' Up! store!
And in upcoming events, if you have a mother, friend or grad that you need a thoughtful gift for, come to my Mini Memory Album class! You can bring your own pictures or come to create the book and add photos later. The cost is $17 and you MUST bring your own Scissors, SNAIL adhesive and Glue Dots. If you forget your adhesive, I will let you buy new ones from me :) Please register below.
Friday, October 11, 2013
5 Ways on Fridays: Envelope Punch Board
Today I'm sharing FIVE amazing ways to use the new Envelope Punch Board from Stampin' Up! (Item #133774). Once you see these, you'll NEED your own and you can order it from My Stampin; Up! Store Since it's Halloween season, I made most of my samples using the Witches Brew Designer Series Paper (132185), Toil & Trouble and Tags 4 You stamp sets (Holiday Catalog) and Label Bracket punch (132153)
1. Make Envelopes. Stating the painfully obvious, but hey...that's what it was made for! Just remember this: Envelopes don't always have to hold just a card :)
2. File Folder Cards. These unique cards are so much fun to make and you could create a whole slew of little file folders to organize things like photos, paper embellishments, receipts, etc.
Patty Bennett's Video Tutorial explains how simple these are, and once you've made a few, you just can't stop!
3. Boxes. Yep, that's right: The Envelope Punch Board can make BOXES! Here are two of my top picks (because they are both simple, and I'm all about easy!)
Elaine Schader (at Elaine's Creations) made this box to hold some eerily adorable Halloween tags from four envelopes made with the Punch Board. Check it out on HER BLOG.
Designed to hold 4 cards & envelopes, I discovered (after I whipped this one out in no time flat) that this little gem also holds a King Size Kit Kat! I followed the instructions by Cindy Beach at Stamp, Paper and Ink. The only modification I made was to use my Word Window punch to create a place to insert the top flap and hold it closed.
Learn to make another candy bar box on THIS video tutorial by Janet Wakeland
5. Envelope Tag Book. Here's one for the memory keepers...or this could be a fun way to present love coupons, a grandma brag book or just for fun.
Tricia over at the Efficient Crafter is the artist for this project and her motto, "Quick...Let's Craft!" tells me she's my kind of lady! View her tutorial HERE.
------------------------------------------------------
So there you have FIVE different ways to use the new Envelope Punch Board! It's a MUST HAVE tool for your Craft Closet and you can order it in Loni's Stampin' Store today. If you have another great way to use the EPB, leave a comment below to help compile a resource for more excellent ideas!
Friday, October 4, 2013
Bottle Bib Pocket: Whip One Up In a Jiffy (Video Tutorial)
Waiting in line at the Cal Ranch store in Spanish Fork, I saw a display of awesome bottled pop. One that caught my eye was called, "Dang! That's Good" Root Beer...even the bottle cap was cute! The colors effused FALL and the Stampin' Up! Sweater Weather came to mind. So I grabbed a handful of bottles and decided I'd figure some way to use them :)
Then I went shopping and saw the Caramel Apple bite by Russell Stover and if you know me well, I'm an even bigger sucker for CARAMEL than I am for chocolate (and that's sayin' something). So I put another handful in my cart and whistled all the way home!
My solution? What I call a "Bottle Bib Pocket"! It was actually inspired by a project made by my friend Pam Clyde, whose artistry is beautifully detailed. I'm more of a quick and easy crafter, but I think you'll like both :)
I made a video tutorial for the simple one...I'll let Cal Ranch know they better stock up on "cute" soda pop :D I suspect it tastes as good as it looks, but I don't know as I've been giving all mine away to my Stampin' Up! hostesses as I demonstrate them! Want me to teach you and your friends? Book a party during October!
Then I went shopping and saw the Caramel Apple bite by Russell Stover and if you know me well, I'm an even bigger sucker for CARAMEL than I am for chocolate (and that's sayin' something). So I put another handful in my cart and whistled all the way home!
My solution? What I call a "Bottle Bib Pocket"! It was actually inspired by a project made by my friend Pam Clyde, whose artistry is beautifully detailed. I'm more of a quick and easy crafter, but I think you'll like both :)
I made a video tutorial for the simple one...I'll let Cal Ranch know they better stock up on "cute" soda pop :D I suspect it tastes as good as it looks, but I don't know as I've been giving all mine away to my Stampin' Up! hostesses as I demonstrate them! Want me to teach you and your friends? Book a party during October!
Saturday, September 21, 2013
Candy Corn & Paper Piecing Mashup
A sure sign of fall isn't the falling leaves or cooler temperatures...it's the CANDY! Remember when you could ONLY get candy corn in Autumn and Peeps at Easter? That was before they started making pastel corn for Easter and Peeps ghosts for Halloween...ah, the good old days...
I've been thinking about tags lately, so this popped into my head when I saw the Friday Mashup challenge (mashing up a fall food theme and paper piercing, FM128) and the Freshly Made Sketch (FMS104) this week:
The paper piercing was inspired by Patty B (but on a smaller version of hers). Here's how I made the candy corn:
I've been thinking about tags lately, so this popped into my head when I saw the Friday Mashup challenge (mashing up a fall food theme and paper piercing, FM128) and the Freshly Made Sketch (FMS104) this week:
The paper piercing was inspired by Patty B (but on a smaller version of hers). Here's how I made the candy corn:
So there's a sweet treat double whammy (or is it a triple?) for you today!
Project Recipe (all supplies from Stampin' Up! unless noted):
Stamps: Sweets for the Sweet stamp set
Ink: Chocolate Chip, Pumpkin Pie, Crushed Curry
Paper: Sweater Weather Designer Series Paper (132184), card stock: Pumpkin Pie, Crushed Curry, Very Vanilla, Whisper White
Accessories: Stampin' Sponge, Crushed Curry 3/4" Chevron Ribbon (130019), Early Espresso Baker's Twine (123124), 4x6 Cellophane bag (102757). Punches: 1/2" circle (119869), 1" circle (119868), 1-3/8" circle (119860), Artisan Label (130920). OTHER: CANDY CORN
Update 9/30/13: My project was voted as ROCKSTAR at the Friday Mashup! Wahoo!
Monday, August 12, 2013
Sketchin' It Today...
Just having fun with the sketch over at Create with Connie and Mary today...one super simple version and another simply simple for CCMC263:
Card Recipe (all supplies from Stampin' Up!):
Stamps: Paper Pumpkin Welcome Kit (For more info on My Paper Pumpkin, read THIS POST)
Ink: Whisper White & Early Espresso stamp pads
Paper: Early Espresso card stock and Soho Subway Designer Series Paper (130140)
Accessories: Epic Day Washi Tape (131269) and Hardware Clips Essentials (129964)
Card Recipe (all from SU!):
Stamps: Too Kind and Loving Thoughts
Ink: Wisteria Wonder, Elegant Eggplant, Pear Pizzaz and Always Artichoke
Paper: Wisteria Wonder, Elegant Eggplant, Pear Pizzaz and Whisper White card stock
Accessories: Decorative Label Punch (120907), 1-3/8" circle punch (119860), Paper Piercing Tool, Beautiful Wings Embosslit (118318), Modern Mosaic Embossing Folder (129984), Big Shot Die-Cutting Machine (113439) and Rhinestone Basic Jewels (119246)
Card Recipe (all supplies from Stampin' Up!):
Stamps: Paper Pumpkin Welcome Kit (For more info on My Paper Pumpkin, read THIS POST)
Ink: Whisper White & Early Espresso stamp pads
Paper: Early Espresso card stock and Soho Subway Designer Series Paper (130140)
Accessories: Epic Day Washi Tape (131269) and Hardware Clips Essentials (129964)
Card Recipe (all from SU!):
Stamps: Too Kind and Loving Thoughts
Ink: Wisteria Wonder, Elegant Eggplant, Pear Pizzaz and Always Artichoke
Paper: Wisteria Wonder, Elegant Eggplant, Pear Pizzaz and Whisper White card stock
Accessories: Decorative Label Punch (120907), 1-3/8" circle punch (119860), Paper Piercing Tool, Beautiful Wings Embosslit (118318), Modern Mosaic Embossing Folder (129984), Big Shot Die-Cutting Machine (113439) and Rhinestone Basic Jewels (119246)
Tuesday, July 2, 2013
Give "Fourth" a Little Sparkle
Looking for a quick Independence Day favor? Try this!
Stampin' Up!'s 1"x8" cello bags are perfect for a few sparklers and dress it up with a label and shimmery star...it's festive and quick for your 4th of July celebration or a gift for a friend.
Project Recipe (all supplies from Stampin' Up!) :
Stamps: Simply Stars, Label Love
Ink: Smoky Slate and Real Red ink pads
Paper: Midnight Muse & Whisper White card stock, Silver Glimmer Paper (124005)
Accessories: Artisan Label (130920), 7/8" Scallop Circle (129404) and small Star (retired) punches. 1"x8" Cello Bags (124134)
And for those of you with children, THIS is a genius sparkler safety tip: Use a large plastic cup as a Sparkler shield to keep little ones from getting burned!

Have a SAFE and happy 4th!
Thursday, June 13, 2013
Dads & Grads: Blue Ribbon Days!
Quick share today! I used the Blue Ribbon stamp set to create a card for Dad:
And also a card for a Grad!
And here's a little tip on how to use your 2-3/8" Scallop circle punch to punch out the medallion without cutting off the ribbons: Just cut up the side of each ribbon first, then pull it out the top of the punch:
Whoever thought that one up deserves a ribbon!
Thursday, May 23, 2013
Cap & Gown: A Gift for Grads
Today was a proud moment for a mother:
There must be an official name for the pocket than hangs off a bottle, but for today's purpose, we'll call it a pop-pocket, which I made from the Oval Accent Bigz die, the Big Shot and a few well placed score lines. For the owl, I added a few wings (with a scallop oval punch cut in half) to the owl punch (such a cutie) as well as a cap and tassel to dress him appropriately.
Project Recipe:
With Braden after the ceremony. his dad and I were very grateful for reaching this Milestone! It's bittersweet to watch your babies grow up.
As my graduating senior had a few friends graduating with him, I came up with this fun gift which incorporated a few of his favorite things:

Project Recipe:
- Paper: Basic Black, Real Red, Whisper White and Smoky Slate card stock.
- Accessories from Stampin' Up!: Big Shot (113439), Oval Accent Bigz Clear die (127005), Simply Scored (122334), Brights Brads (119740), Cherry Cobbler Baker's Twine (123125 Punches: Owl Builder (118074), 1-1/4" Scallop Circle (127811), 1-1/4" Circle.
- Other: Curling Ribbon
With Braden after the ceremony. his dad and I were very grateful for reaching this Milestone! It's bittersweet to watch your babies grow up.
Wednesday, April 24, 2013
Retirement: You've been good, but now you're gone...
A bittersweet day at Stampin' Up! when the Retirement List is posted: Parting is sweet sorrow for many of my favs (So long, dear stamps...for some, I never used thee!) but the anticipation to fill my shelves with NEW products cheers my heart. I will warn you as you look at the following lists: Everything is available while supplies last (some are already gone!!), so grab your highlighter and mark the ones you must have and ORDER them ASAP!
Here is an appropriate and elegant card I made at a Shoebox Swap during Convention (designed by demonstrator Sharon Fisher?) that showcases a few of the *soon-to-be-retired products:
Card Recipe:
Helpful Hints for creating a card like this:
1. Ink one side of the embossing folder with Versamark and place DSP inside and run through Big Shot to emboss design. Immediately sprinkle the wet (Versamark) side of the DSP with black embossing powder, shake off excess and heat to set.
2. After stamping, punching and assembling flower, "paint" on petals with 2-Way glue pen and sprinkle on Dazzling Diamonds glitter. Shake off excess.
Click on the images for a printable PDF file including retiring accessories
Here is an appropriate and elegant card I made at a Shoebox Swap during Convention (designed by demonstrator Sharon Fisher?) that showcases a few of the *soon-to-be-retired products:
Card Recipe:
- Stamps: *Build a Blossom and *Word Play stamp sets
- Ink: Basic Black and Versamark
- Paper: Very Vanilla & Basic Black card stock, First Edition Specialty DSP (121878)
- Accessories: *Blossom Petals punch (121808), Scallop Trim Border Punch (118402), Vintage Wallpaper embossing folder (120175), Big Shot (113439), Heat Tool (129053), Black embossing powder (109133), Dazzling Details glitter (124177), 2-Way Glue Pen (100426) and Stampin' Dimensionals (104430)
Helpful Hints for creating a card like this:
1. Ink one side of the embossing folder with Versamark and place DSP inside and run through Big Shot to emboss design. Immediately sprinkle the wet (Versamark) side of the DSP with black embossing powder, shake off excess and heat to set.
2. After stamping, punching and assembling flower, "paint" on petals with 2-Way glue pen and sprinkle on Dazzling Diamonds glitter. Shake off excess.
Monday, March 18, 2013
A Happy Hello/Goodbye Sale-a-Bration
5 days left of Sale-a-Bration and I've had fun demonstrating these boxes at my March parties from the Happy Hello Card Kit:
The instructions for the boxes are on Barb's website HERE...and my only change/suggestion to make it easier is to put your card on the Simply Scored with the flat side flush against the left side and score at 1", then flip the card over so the other flat edge is flush against the left side and score again at 1". Turn the card so the blue chevrons are on the left edge and score down the edge of the pattern at 3".
I used a clear envelope with the sticky flap cut off for the "bag" inside the box and filled it with chocolate, my favorite treat.
They are really fun to make, but since the kit comes with 8 cards and envelopes (and everything else to make these cards)...
Here are the simple steps to make your own:
1. Cut white card stock 2-3/4" x 9-3/4". Score at 1-7/8" and 5-7/8" on the Simply Scored Tool (122334). Punch a half circle (I used the 1-3/8" punch) on the smaller flap edge and the Scallop Trim Border punch (118402) on the larger side edge. Adhere sticky strip to the very edge of the smaller flap sides.
2. On the opposite side of the card stock, stamp your image. NOTE: This image is from the Carry On set which is only available when you host a party and will be retired at the end of May...call me today to schedule a private class :)
3. Remove red from sticky strip and fold in to create pocket. Add a small strip of colored card stock under the decorative edge and mount the pocket to a 4-1/4" x 3" piece of card stock.
4. Take the envelope from the Happy Hello Sale-a-Bration card kit and score at 1-3/8" and 4-1/2" using the Simply Scored.
5. Insert a 3-3/4" x 3" piece of Designer Series Paper into the scored envelope and mark with pen so you know where to trim:
6. Remove the DSP, trim and adhere to center front section of envelope. Trim into the envelope flap along score lines, fold and adhere to sides (or remove). Insert card into envelope.
7. Punch 8 layers of Creped Filter Paper (129393) using 1-1/4" scallop circle punch (127811) and push brad through the center of all circles. Scrunch each layer up to form flower. Spray flower with Stampin' Spritzer (126185) filled with rubbing alcohol and 4 drops of re-inker (I used Melon Mambo). Create a belly band with the Dotted Scallop Ribbon Border punch (119275) and insert flower brad to secure in the front.
Voila! A beautiful way to present a gift card AND use up those gorgeous envelopes from the Happy Hello Card Kit from Sale-a-Bration!
The instructions for the boxes are on Barb's website HERE...and my only change/suggestion to make it easier is to put your card on the Simply Scored with the flat side flush against the left side and score at 1", then flip the card over so the other flat edge is flush against the left side and score again at 1". Turn the card so the blue chevrons are on the left edge and score down the edge of the pattern at 3".
I used a clear envelope with the sticky flap cut off for the "bag" inside the box and filled it with chocolate, my favorite treat.
They are really fun to make, but since the kit comes with 8 cards and envelopes (and everything else to make these cards)...
...I had a lot of these cute envelopes left over! What to do with them?? So I came up with this:
It's a gift card holder!Here are the simple steps to make your own:
1. Cut white card stock 2-3/4" x 9-3/4". Score at 1-7/8" and 5-7/8" on the Simply Scored Tool (122334). Punch a half circle (I used the 1-3/8" punch) on the smaller flap edge and the Scallop Trim Border punch (118402) on the larger side edge. Adhere sticky strip to the very edge of the smaller flap sides.
2. On the opposite side of the card stock, stamp your image. NOTE: This image is from the Carry On set which is only available when you host a party and will be retired at the end of May...call me today to schedule a private class :)
3. Remove red from sticky strip and fold in to create pocket. Add a small strip of colored card stock under the decorative edge and mount the pocket to a 4-1/4" x 3" piece of card stock.
4. Take the envelope from the Happy Hello Sale-a-Bration card kit and score at 1-3/8" and 4-1/2" using the Simply Scored.
5. Insert a 3-3/4" x 3" piece of Designer Series Paper into the scored envelope and mark with pen so you know where to trim:
7. Punch 8 layers of Creped Filter Paper (129393) using 1-1/4" scallop circle punch (127811) and push brad through the center of all circles. Scrunch each layer up to form flower. Spray flower with Stampin' Spritzer (126185) filled with rubbing alcohol and 4 drops of re-inker (I used Melon Mambo). Create a belly band with the Dotted Scallop Ribbon Border punch (119275) and insert flower brad to secure in the front.
Voila! A beautiful way to present a gift card AND use up those gorgeous envelopes from the Happy Hello Card Kit from Sale-a-Bration!
VISIT MY STAMPIN' STORE
to purchase the items used in this tutorial and get the Happy Hello Card Kit FREE when you spend $50...but hurry! It's only available through Friday, March 22nd when we must say GOOD-BYE to Sale-a-Bration 2013 :(
Labels:
Belly-Band,
Border Punch,
Boxes,
Creped Fliter Paper,
Envelopes,
Gift Card,
Gifts,
Happy Hello Card Kit,
Kits,
Punches,
Sale-a-Bration,
Simply Scored,
Spritzer,
Tutorial
Subscribe to:
Posts (Atom)