Showing posts with label Kits. Show all posts

Monday, July 7, 2014

Love Your Mailbox

If I could crochet, I'd make one of these for my mailbox:
"WHY?" you may ask...we'll let me tell you:

Once a month I go to my mailbox and it gives me a beautiful RED BOX like this: 
https://mypaperpumpkin.com?demoid=810
And inside this box is a magical creative escape!

I've told you about My Paper Pumpkin before, and you may be thinking "But you are always making something crafty...what's so special about this box?" and the answer is: "But I don't have to cut any paper or come up with a new idea...I just open the box and create something that is prepared for me!"

And that's why I want to thank my mailbox. I think it should know how much I love it.

If you want to love YOUR mailbox as much as mine (but don't want to crochet a blanket for it), then you can subscribe to My Paper Pumpkin, too: https://mypaperpumpkin.com?demoid=810

Check out the AWESOME Pinterest board of all things Paper Pumpkin here:  
http://www.pinterest.com/paperpumpkin/

You can now pre-pay for subscriptions too:

www.stampinup.com/ECWeb/ItemList.aspx?categoryID=1444&dbwsdemoid=810
www.stampinup.com/ECWeb/ItemList.aspx?categoryID=1444&dbwsdemoid=810 
These can be ordered on my website or at a workshop!
 You will get an email with a code to enter at MyPaperPumpkin.com to redeem for your subscription. 

Subscribe by July 10th to receive the July Paper Pumpkin kit (rumor has it you don't want to miss it!)
Subscribe by July 27th for a FREE GIFT from me to help you organize your Paper Pumpkin stamps!
post signature

Wednesday, November 13, 2013

A Snow Flurry

Though it's still unseasonably warm in Utah for November, we are experiencing a flurry of SNOW from Stampin' Up!...starting with this gorgeous Simply Created Kit which makes 10 snowflakes to frost your tree, adorn a gift or shimmer on a mantel! I think these will sell out quickly, so order quickly!

And a NEW Photopolymer stamp set, ENDLESS WISHES, has the sweetest sentiments along with a few crystal flakes:

And some awesome deals from the Holiday Catalog this week:

post signature

Friday, October 18, 2013

5 Ways on Fridays: Thankful Tablescape Simply Created Kit


The pieces of the new Thankful Tablescape Simply Created Kit (item 133463) in the Stampin' Up! Holiday Catalog were designed to decorate a Thanksgiving table, but of course, people get crafty and find new ways to utilize the parts in unique ways, so come along as I share a few of my favorites! Leave a link to other awesome crafts using this kit in the comments. 

1. Starting with cards, here's a pocket card I created from the Tablescape kit following the 
All I added was a crumb cake envelope (for the pocket), a piece of Early Espresso card stock, a strip of 1-1/4" Burlap Ribbon (132140) and I punched the circle using the 2-1/2" circle punch (120906). 

2. At SU! convention in July, Sara Douglass demonstrated how to create a Thankful Journal from the Tablescape kit, but my photos weren't that great, so a quick internet search found another Sarah (Sagert) who had crafted her own...with some nice pictures of her lovely pages :)

3. Admittedly, I'm a sucker for anything in a mason jar, so Jessica Lewis' simply sweet Thankful Jar immediately appealed to me! Can't you just imagine filling this with reasons to be grateful? 
The Birch paper and chocolate chip herringbone paper both come on a roll in the kit and are perfect for wrapping around a vase, jar or candle. 

4. Allison Okamitsu (a very talented Canadian demonstrator) created the last two gorgeous home decor projects from the Thankful Tablescape Simply Created Kit. The first is a Thankful Banner and you see more of this beauty by clicking on the picture.  

5. I love Allison's style and her blog is "Nice People Stamp". Haven't met her, but it's a given she's one NICE person to share her talents! This is also her creation~A frame covered in the Birch-bark paper from the kit. Isn't the banner adorable? Visit Allison's tutorial for the frame HERE (or click on photo)

Thanks for checking out my 5 Ways on Fridays collection! Order the Thanksgiving Tablescape Kit from my Stampin' Store to create some fabulous Fall creations of your own, then post a link to them in the comments so we can be inspired by YOU!
post signature

Tuesday, October 8, 2013

Grundles of Cards & Tags!

Pretty excited about the two newest products from Stampin' Up! because both would be awesome gifts to give a friend or yourself. In fact, I plan to do both :)

First is the Everyday Occasions Card Making Kit (Item 134797) and you get everything (minus scissors & adhesive) to create 20 cards for just $29.95:
Everday Occasions Kit
NOTE: These are only available while supplies last!

Second, may I present the Pop & Place Holiday Gift Tag Book and Photopolymer Stamps:


You can order them today in my store and check a few names off your Christmas Shopping List!

post signature

Wednesday, August 14, 2013

Helping Make Your Holidays Happier


The holidays are just around the corner! But if you’ve seen Stampin’ Up!’s Holiday Catalog, you know that it’s not time to panic because we have the holidays all wrapped up. Whether you have gifts, wrapping, or décor with all of the trimmings on your list, you’ll find it all in the Holiday Catalog with festive inspiration. For example, there is the Thankful Tablescape Simply Created Kit (#133463) - perfect for all of your fall gatherings and events. And when you bundle it with the Thankful stamp (#133341 - bundle), that’s a 15% savings for you! 


Now is the perfect time to get started planning, so if you haven’t seen the Holiday Catalog yet, contact me to your own copy or come to one of my upcoming events. Don’t forget that when you shop with Stampin’ Up!, you receive rewards when your order reaches $150 - and that includes products from the 2013-2014 Annual Catalog, the Holiday Catalog, the Clearance Rack, and My Digital Studio downloads. So get a head start on your holidays and have it delivered right to your front door. 


Have you been trying to think of a way to make holidays more affordable this year? Well, have you ever considered doing what I do and becoming a Stampin’ Up! demonstrator? Not only will you be able to get your holiday supplies at a discount, you can also earn additional income all while working around your family and holiday events. And just for signing up to become a Stampin’ Up! by the end of August, you’ll also get to choose a fabulous project kit to add to your Starter Kit at no additional cost. Just contact me today and we can get you started.


So start making your lists and your plans, and let Stampin’ Up! And your Holiday Catalog be your go-to resources this season.

Shop from the HOLIDAY CATALOG HERE

Find out more about starting your own Stampin' Up! business HERE.

post signature

Tuesday, August 6, 2013

Tag-a-Bag Album & Class

If you've been busy making memories this summer, you'll want to preserve them to share in this whimsical Paper Bag Album...and you can finish it in about an hour at my class next Wednesday!

With 10 delightful chevron pages, pockets and tassels, there is plenty of room to store pictures & memorabilia from a family vacation, a special friendship or just capture the everyday happiness at your house. Participants need to bring scissors and adhesive, everything else is provided.

When: Wednesday, August 14th at 10 a.m. ~OR~ 7:30 p.m.
Where: My house in Spanish Fork, UT (Ask for directions when registering, if needed)
Cost: $18


post signature

Monday, July 15, 2013

Pick-a-Kit

Freedom is all about choices, isn't it? We have a great choice for you at Stampin' Up! when you become a demonstrator before August 31st: Pick a Project kit FREE!
With four AWESOME Project Kits to choose from:

  1. Simply Created Halloween Banner
  2. Simply Created Christmas Banner 
  3. Simply Created Thankful Tablescape Kit
  4. Tag-a-Box Bundle
...the hardest part will be making up your mind which you want! 


Need more reasons to become a demonstrator? I'll be listing 25 reasons (for Stampin' Up!'s 25th Anniversary) on my Facebook Page along with updates from Stampin' Up! Convention this week!

post signature

Monday, April 29, 2013

Bloomin' Bouquet Kit


Mother's Day. Teacher appreciation. Just because. Say thank you with this no-maintenance bouquet. There's no watering, no weeding-just enjoying. This easy-to-assemble kit comes complete with the petals, stems, and buttons to create the flowers, as well as four different tags to make this the perfect gift for any occasion. All you need is some paper, ribbon or a vase to add the finishing touches to the bouquet.

As if that weren't enough, the kit contains a "baker's dozen"! This means you can create and give (or keep) a dozen flowers, and have a bonus flower left over to pass along to someone new! Give it to someone you wouldn't normally think of: a teller at the bank, a grocery store clerk, or the librarian at your local library. Anyone you encounter on your way that you'd like to give a little "thank you" to-and introduce them to Stampin' Up!

Ordering information:
Item 134542 $12.95 Available starting April 29, while supplies last.


Kit contents:
  • 2 sheets of preprinted and precut flowers on 12" X 12" cardstock; makes 13 flowers using Pool Party, Gumball Green, Calypso Coral, Daffodil Delight, and Rich Razzleberry
  • 13 Vintage Faceted Buttons
  • 13 green floral wire stems
Adhesive not included. (Glue gun recommended.)

post signature

Tuesday, April 23, 2013

Departing from "Normal" with My Paper Pumpkin

Pop Quiz! Yes or No...have you ever thought to yourself:
  • "I'd love to make cards but I don't have the time"
  • "There is no space in my house to craft"
  • "I don't have a creative bone in my body"
  • "Stamping looks expensive and I don't have the $$ to start a hobby like that!"
If you answered YES to any of those questions, read on Friend!

I've been enjoying My Paper Pumpkin, the new "Kit of the Month" program for people who have had the thoughts above...so let's quickly dispel any negative vibes by comforting the fore-mentioned concerns:
  • No Time? Each kit is designed to be finished in 30 minutes or less
  • No Space? A year's worth of supplies (MPP provides EVERYTHING you need--except scissors & adhesive) would fit inside a SHOEBOX...the things you create will be things you use or share (could be cards, journals, home decor, gifts, etc)
  • Not Creative? You can COPY the design/instructions included in each kit, or, as your creative muscles build strength, shake it up a bit (see samples below).
  • No Dough $? At $19.95 (plus tax) MPP is about the same cost as going out to lunch with friends, but you'll have some cool finished projects to share with those friends and lots of supplies remaining to use again in the future!
This was the card designed for April's kit that I just got in the mail last week:
 
Because I don't like "naked" envelopes, you'll see I've dressed  up each one below the cards :)

The kit included supplies to create 4 cards, and you are welcome to make them all the same, but using the kit, here are a few other "versions" I created as a departure from the NORM...as you gain confidence, you'll find yourself mixing it up, too!

For the next one I pulled out the stamps from the Welcome Kit (which is the first one you'd receive when you subscribe) to use...you'll be able to mix and match supplies throughout the year!

Everything is cut and prepared for you to use...the only things you need to add are scissors (surely you have those laying around somewhere!) and adhesive (I prefer SNAIL from Stampin' Up!).

Once you are done creating, you could find a box to store your stamps in, but if you subscribe through me, I'll happily send you a case for your storage as a THANK YOU gift :
And before I forget: Did I mention that you can cancel your membership at any time? Or even just put your order on hold for a month? My Paper Pumpkin is as flexible as you are! Just make sure that you change your subscription before the 10th of the month. You could even ADD a kit one month to give as a gift (or two, or three...)

For more information or to give it a whirl, CLICK HERE. And if you are looking for a gift that "keeps on giving", why not try it for a mom, sister, daughter, husband or friend? Chances are, they'll love it too!
post signature

Friday, April 19, 2013

The Whole Kit & Kaboodle

Did you know we have all sorts of KITS at Stampin' Up! to make your crafting simple and enjoyable? I really love this new All Dolled Up kit that was created by Chris G, a fellow demonstrator from Ohio which creates 6 feminine birthday cards in minutes:
It comes with everything shown for just $15.95 (item 133913)...all you will need is a clear block (D or H recommended) and adhesive. With everything cut and prepared for you, you will feel the joy of creativity immediately :)

That's not the only kit waiting to help you capture your creativity with ease...have you ordered "This & That"? It's 15% off the whole bundle when you order it before April 30th!
This & That
The thing that makes me the most giddy in this kit is that little rotary stamp!! I'm using my kit to capture the thrill of Stampin' Up! Convention in July, but I'd love to hear what you are going to do with yours...

Speaking of limited time, the Sent with Love bundle is going to be flying away at the end of the month, too. These are just a few of the cards you could create with the bundle, but you can purchase the stamps and paper separately, should you want to stock up for future creations:


But wait, there's more! You may have heard about the "gift that keeps on giving", but Stampin' Up! really has it with My Paper Pumpkin...
Guys...don't just give ONE gift to your gal for mother's day or her birthday: Subscribe for a whole year at My Paper Pumpkin and be sure to select Loni Spendlove as your demonstrator!

Just want to give My Paper Pumpkin a try or give one kit as a gift? Choose the "Try It" Kit that you can add to any order (item 132600) OR you can sign up and cancel at any time.


All this and more can be found in my store. Thanks for stopping by today!
post signature

Monday, March 18, 2013

A Happy Hello/Goodbye Sale-a-Bration

5 days left of Sale-a-Bration and I've had fun demonstrating these boxes at my March parties from the Happy Hello Card Kit:
The instructions for the boxes are on Barb's website HERE...and my only change/suggestion to make it easier is to put your card on the Simply Scored with the flat side flush against the left side and score at 1", then flip the card over so the other flat edge is flush against the left side and score again at 1". Turn the card so the blue chevrons are on the left edge and score down the edge of the pattern at 3".

I used a clear envelope with the sticky flap cut off for the "bag" inside the box and filled it with chocolate, my favorite treat.

They are really fun to make, but since the kit comes with 8 cards and envelopes (and everything else to make these cards)...
...I had a lot of these cute envelopes left over! What to do with them?? So I came up with this:
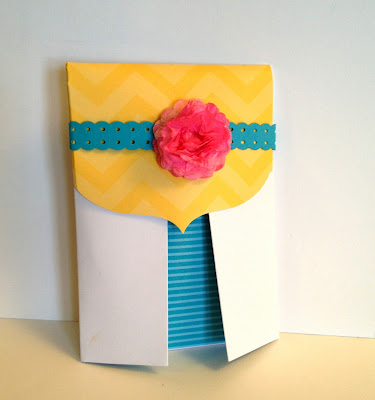
It's a gift card holder!
Here are the simple steps to make your own:

1. Cut white card stock 2-3/4" x 9-3/4". Score at 1-7/8" and 5-7/8" on the Simply Scored Tool (122334).  Punch a half circle (I used the 1-3/8" punch) on the smaller flap edge and the Scallop Trim Border punch (118402) on the larger side edge. Adhere sticky strip to the very edge of the smaller flap sides.
2. On the opposite side of the card stock, stamp your image. NOTE: This image is from the Carry On set which is only available when you host a party and will be retired at the end of May...call me today to schedule a private class :)
3. Remove red from sticky strip and fold in to create pocket. Add a small strip of colored card stock under the decorative edge and mount the pocket to a 4-1/4" x 3" piece of card stock.
4. Take the envelope from the Happy Hello Sale-a-Bration card kit and score at 1-3/8" and 4-1/2" using the Simply Scored.
5. Insert a 3-3/4" x 3" piece of Designer Series Paper into the scored envelope and mark with pen so you know where to trim:
6. Remove the DSP, trim and adhere to center front section of envelope. Trim into the envelope flap along score lines, fold and adhere to sides (or remove). Insert card into envelope.
7. Punch 8 layers of Creped Filter Paper (129393) using 1-1/4" scallop circle punch (127811) and push brad through the center of all circles. Scrunch each layer up to form flower. Spray flower with Stampin' Spritzer (126185) filled with rubbing alcohol and 4 drops of re-inker (I used Melon Mambo). Create a belly band with the Dotted Scallop Ribbon Border punch (119275) and insert flower brad to secure in the front.
Voila! A beautiful way to present a gift card AND use up those gorgeous envelopes from the Happy Hello Card Kit from Sale-a-Bration!
to purchase the items used in this tutorial and get the Happy Hello Card Kit FREE when you spend $50...but hurry! It's only available through Friday, March 22nd when we must say GOOD-BYE to Sale-a-Bration 2013 :(
post signature